
Quick Recipe Version (TL;DR)
Quick Ingredients
- 3 lb bone-in chicken pieces (drumsticks, thighs, or bone-in breasts, skin on)
- 2 cups buttermilk
- 2 tbsp hot sauce
- 3 garlic cloves, minced
- 2 tsp kosher salt, plus more for seasoning
- 2 cups all-purpose flour
- 1/2 cup cornstarch
- Paprika, garlic powder, onion powder, cayenne, black pepper, dried herbs
- 1–1.5 quarts neutral oil (canola, peanut, or vegetable) for frying
- 1/2 cup honey + 1–2 tbsp hot sauce for hot honey
- Optional: Coleslaw mix + simple creamy dressing
Do This
- 1. Toss chicken with buttermilk, hot sauce, garlic, and salt. Cover and chill at least 4 hours (up to 24).
- 2. Stir together flour, cornstarch, spices, and herbs in a shallow bowl.
- 3. Lift chicken from marinade, letting excess drip, then coat thoroughly in seasoned flour, pressing to adhere. Rest 10–15 minutes.
- 4. Heat 1.5–2 inches of oil in a heavy pot to 325–350°F (163–177°C).
- 5. Fry chicken in batches 10–15 minutes, turning occasionally, until deep golden and 165°F (74°C) inside.
- 6. Drain on a wire rack, sprinkle lightly with salt while hot.
- 7. Warm honey with hot sauce and a pinch of chili flakes; drizzle over chicken and serve with coleslaw.
Why You’ll Love This Recipe
- Ultra-crispy, craggy crust that actually stays crunchy, thanks to buttermilk and cornstarch.
- Juicy, well-seasoned meat all the way to the bone from an overnight buttermilk soak.
- Big flavor without fussy techniques: one marinade, one seasoned flour, and straightforward frying.
- Perfect party plate with sweet-spicy hot honey and cool, creamy coleslaw to balance every bite.
Grocery List
- Produce: 3 garlic cloves, 4 cups shredded cabbage or coleslaw mix, 1 small carrot (if shredding your own), 1 small red onion (optional for slaw), lemon or lime (optional garnish)
- Dairy: 2 cups buttermilk, 1/3 cup mayonnaise (for coleslaw), optional: 2 tbsp sour cream or plain yogurt for extra-creamy slaw
- Pantry: 3 lb bone-in chicken pieces, all-purpose flour, cornstarch, honey, hot sauce, red pepper flakes, neutral frying oil (canola, vegetable, peanut, or sunflower), sugar, apple cider vinegar, Dijon mustard, kosher salt, black pepper, paprika, garlic powder, onion powder, cayenne pepper, dried thyme or oregano
Full Ingredients
Buttermilk Fried Chicken
- 3 lb bone-in, skin-on chicken pieces (about 8 pieces: drumsticks, thighs, and/or bone-in breasts cut in half)
Buttermilk Marinade
- 2 cups buttermilk
- 2 tbsp hot sauce (such as Louisiana-style or your favorite)
- 3 garlic cloves, minced
- 2 tsp kosher salt
- 1 tsp freshly ground black pepper
- 1 tsp paprika (smoked or sweet)
Seasoned Flour Coating
- 2 cups all-purpose flour
- 1/2 cup cornstarch
- 2 tsp kosher salt
- 1 1/2 tsp freshly ground black pepper
- 2 tsp paprika
- 2 tsp garlic powder
- 1 tsp onion powder
- 1 tsp cayenne pepper (use 1/2 tsp for mild, up to 1 1/2 tsp for extra spicy)
- 1 tsp dried thyme or dried oregano
- 1 tsp baking powder (helps create extra craggy, crisp crust)
For Frying
- 1–1.5 quarts neutral oil (enough for 1 1/2–2 inches depth in a Dutch oven or heavy pot)
Hot Honey
- 1/2 cup honey
- 1–2 tbsp hot sauce (to taste)
- 1/2 tsp red pepper flakes (optional, for extra heat and flecks of color)
- Pinch of kosher salt
Simple Coleslaw (Optional but Recommended)
- 4 cups shredded green cabbage or coleslaw mix
- 1 small carrot, grated (omit if using pre-mixed coleslaw that already has carrot)
- 2 tbsp finely sliced red onion (optional)
- 1/3 cup mayonnaise
- 1 tbsp apple cider vinegar
- 1 tsp Dijon mustard
- 1 tsp sugar
- 1/4 tsp kosher salt, plus more to taste
- 1/4 tsp freshly ground black pepper
Step-by-Step Instructions
Step 1: Season and Marinate the Chicken in Buttermilk
Pat the chicken pieces dry with paper towels and trim any excess skin or large fatty flaps, but leave most of the skin on for crispiness. In a large bowl or a zip-top bag, whisk together the buttermilk, hot sauce, minced garlic, kosher salt, black pepper, and paprika until well combined.
Add the chicken pieces to the marinade, turning to coat every piece thoroughly. If using a bowl, press the chicken down so everything is submerged; if using a bag, press out excess air and seal. Refrigerate for at least 4 hours, preferably overnight (up to 24 hours). This time in buttermilk tenderizes the meat and seasons it all the way through.
Step 2: Let Flavors Develop and Prepare for Frying
About 30–40 minutes before you want to fry, remove the marinating chicken from the refrigerator so it can take some of the chill off. Very cold chicken will drop your oil temperature too quickly and can lead to greasy coating. Keep the chicken in the marinade while it sits at room temperature.
Meanwhile, line a large baking sheet with paper towels and place a wire rack on top for draining the fried chicken later. If you plan to keep cooked pieces warm as you fry in batches, preheat your oven to 250°F (120°C) and place another wire rack over a baking sheet inside the oven.
Step 3: Mix the Seasoned Flour Coating
In a large shallow dish (a baking dish or wide bowl works well), combine the flour, cornstarch, kosher salt, black pepper, paprika, garlic powder, onion powder, cayenne pepper, dried thyme or oregano, and baking powder. Use a fork or whisk to mix very thoroughly so the spices are evenly distributed. This seasoned flour is what creates that deeply flavored, crispy, craggy crust.
Taste a tiny pinch of the seasoned flour (just the dry mix) so you can assess the salt level. It should taste distinctly seasoned and a bit salty; the chicken itself will balance it once coated and fried. Adjust the salt or spices slightly to your liking if needed.
Step 4: Dredge the Chicken for a Craggy, Crispy Crust
Working with one piece at a time, lift the chicken from the buttermilk marinade, letting the excess drip back into the bowl. You want it coated but not dripping wet, so give it a gentle shake. Place the chicken into the seasoned flour and press it firmly into the mixture, turning to coat all sides. Really pack the flour onto the chicken with your fingers; this is what forms all those crunchy ridges.
Shake off any obvious loose clumps, then transfer the coated chicken to a clean wire rack or plate. Repeat with all pieces. Once everything is coated, let the chicken sit at room temperature for 10–15 minutes. This rest allows the flour coating to hydrate slightly and adhere, which helps prevent the crust from falling off during frying.
Step 5: Heat the Oil to the Right Temperature
Pour enough neutral oil into a large, heavy-bottomed pot or Dutch oven to reach a depth of about 1 1/2–2 inches. Attach a deep-fry or instant-read thermometer to the side of the pot if you have one. Heat the oil over medium to medium-high heat until it reaches 325–350°F (163–177°C).
If you do not have a thermometer, you can test the oil by sprinkling in a pinch of the seasoned flour: it should sizzle vigorously right away, but not brown instantly. Alternatively, a wooden spoon handle dipped in the oil will release steady bubbles when the oil is ready. Adjust the heat as needed to stabilize the temperature; maintaining a steady oil temperature is key to crispy, not greasy, chicken.
Step 6: Fry the Chicken Until Deeply Golden and Cooked Through
Carefully lower a few pieces of coated chicken into the hot oil, skin side down if using skin-on pieces. Do not overcrowd the pot; work in batches so each piece has space around it. The oil temperature will drop slightly when the chicken goes in—aim to keep it around 300–325°F (149–163°C) during frying by adjusting the heat.
Fry the chicken, turning occasionally with tongs, until the coating is a deep golden brown and the internal temperature reaches at least 165°F (74°C). Dark meat (thighs and drumsticks) will typically take 12–15 minutes; smaller white meat pieces (bone-in breasts) may take 10–12 minutes, depending on size. If any pieces are browning too quickly, move them to a cooler spot in the pot or reduce the heat slightly.
As each batch finishes, transfer the fried chicken to the prepared wire rack to drain. Immediately sprinkle lightly with a pinch of kosher salt while the chicken is still hot to enhance the flavor. If needed, place finished pieces in the warm oven to keep them crisp while you fry the remaining batches.
Step 7: Make the Hot Honey, Coleslaw, and Serve
While the last batch of chicken fries, prepare the hot honey. In a small saucepan over low heat, combine the honey, hot sauce, red pepper flakes (if using), and a pinch of salt. Warm gently, stirring, just until it loosens and is pourable, 1–2 minutes. Do not boil; remove from heat and set aside.
For the simple coleslaw, add the shredded cabbage, grated carrot, and red onion (if using) to a large bowl. In a small bowl, whisk together the mayonnaise, apple cider vinegar, Dijon mustard, sugar, salt, and pepper. Pour the dressing over the vegetables and toss until evenly coated. Taste and adjust salt, pepper, or vinegar as needed.
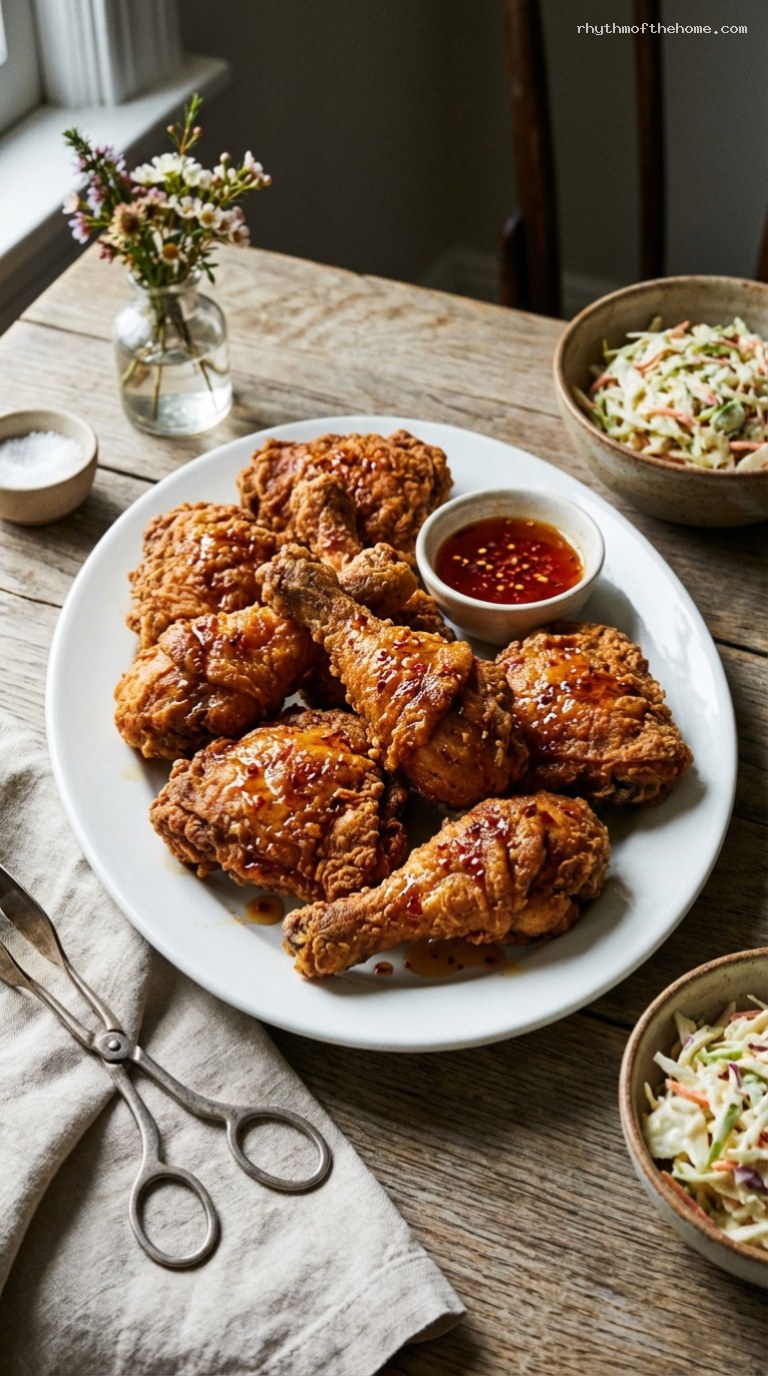
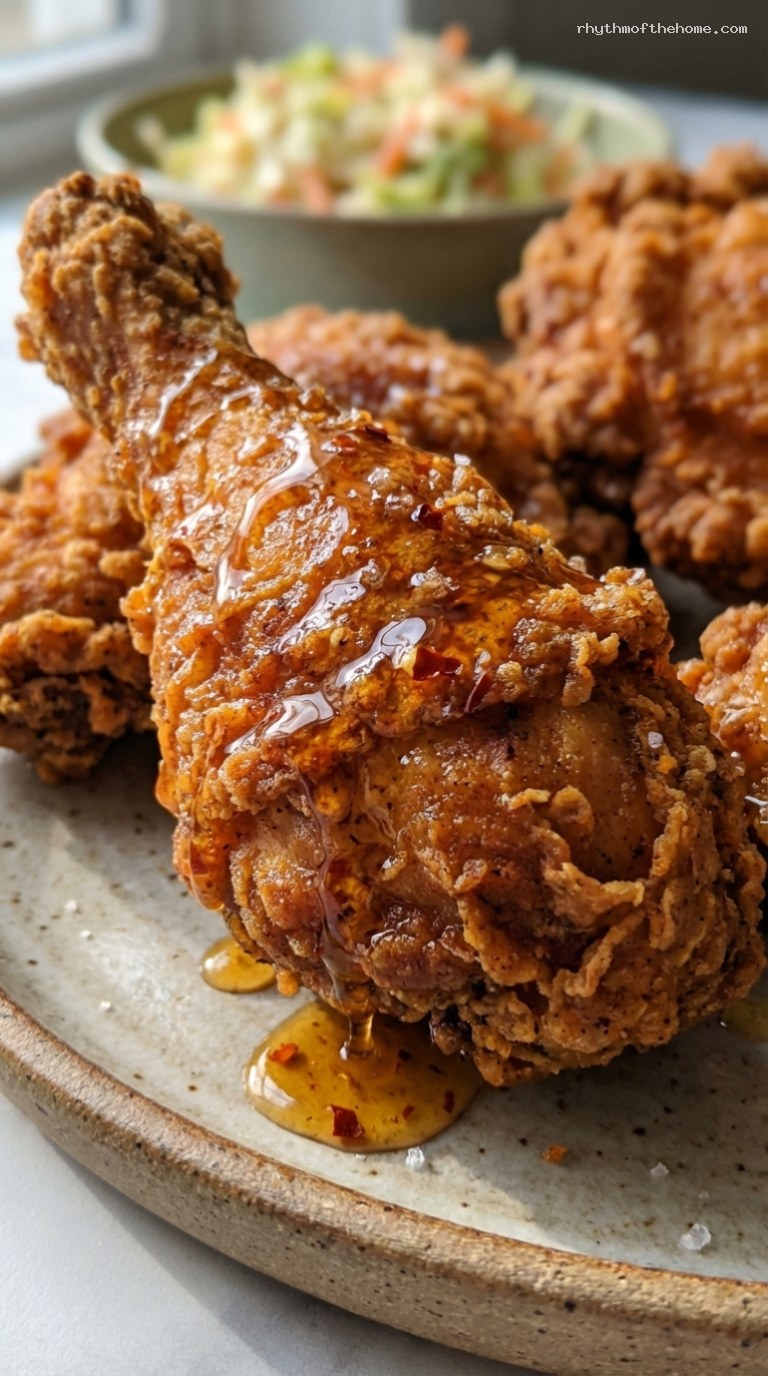
To serve, arrange the crispy fried chicken on a platter. Drizzle some of the warm hot honey over the top, leaving extra on the side for dipping. Add a generous scoop of coleslaw to each plate. Enjoy the chicken hot, while the crust is ultra-crisp and the inside is still steaming and juicy.
Pro Tips
- Marinate longer for more flavor: Four hours is the minimum, but overnight (up to 24 hours) gives the most tender, deeply seasoned chicken.
- Use cornstarch for crunch: The mix of flour plus cornstarch, along with baking powder, creates an extra-light, crackly crust that stays crisp.
- Rest the dredged chicken: Letting the coated chicken sit 10–15 minutes before frying helps the crust adhere and prevents bare spots.
- Control oil temperature: Too hot and the crust burns before the meat cooks; too cool and the coating absorbs oil. Aim for 300–325°F while frying.
- Wire rack over paper towels: Draining on a rack instead of directly on paper towels allows air to circulate so the underside stays crisp.
Variations
- Extra Spicy Nashville-Style: Increase the cayenne in the flour coating to 2 tsp. After frying, stir 2–3 tbsp frying oil into your hot honey with extra cayenne and brush it generously over the chicken.
- Herb and Lemon Fried Chicken: Add 2 tsp lemon zest and 2 tbsp finely chopped fresh herbs (parsley, thyme, chives) to the buttermilk marinade, and finish the fried chicken with a squeeze of fresh lemon juice before serving.
- Fried Chicken Sandwiches: Use boneless thighs pounded to even thickness, fry as directed, then serve on toasted brioche buns with coleslaw and a drizzle of hot honey.
Storage & Make-Ahead
For best texture, fry the chicken just before serving, but you can marinate and prep ahead. The chicken can sit in the buttermilk marinade in the refrigerator for up to 24 hours. You can also mix the seasoned flour up to 2 days ahead and keep it in an airtight container at room temperature. Leftover fried chicken keeps well in the refrigerator, tightly covered, for 3–4 days. To reheat and re-crisp, place pieces on a wire rack set over a baking sheet and warm in a 375°F (190°C) oven for 15–20 minutes, until the crust is hot and crisp again and the chicken is heated through. Fried chicken can also be frozen in a single layer, then transferred to a freezer bag for up to 2 months; reheat from frozen at 375°F (190°C) for 25–30 minutes.
Nutrition (per serving)
Approximate values per serving (about 2 pieces of chicken plus some hot honey, without coleslaw): Calories: ~850; Protein: ~50 g; Fat: ~55 g; Saturated Fat: ~13 g; Carbohydrates: ~40 g; Sugar: ~18 g; Sodium: ~1450 mg. Actual values will vary based on exact cut sizes, how much coating adheres, and how much oil is absorbed during frying.

Leave a Reply