
Quick Recipe Version (TL;DR)
Quick Ingredients
- 16 oblea wafers (5 to 6 inches in diameter)
- 1 cup arequipe (dulce de leche), room temperature
- 1/2 cup finely grated queso fresco or queso costeño (optional)
- 1/3 cup fruit preserves such as guava (bocadillo diluido) or strawberry (optional)
Do This
- 1. Set out 16 wafers and gently warm the arequipe in the microwave for 15–20 seconds until spreadable.
- 2. Spread 2 tablespoons arequipe evenly over 8 wafers, leaving a 1/4-inch border.
- 3. Add a light sprinkle of grated cheese (about 1 tablespoon) and a thin ribbon of preserves (about 1 teaspoon), if using.
- 4. Cap each with a second wafer and press gently but firmly for 10 seconds to adhere.
- 5. Serve immediately, or wrap each sandwich in parchment for on-the-go snacking.
Why You’ll Love This Recipe
- Classic Colombian street-food vibes at home with minimal effort.
- Paper-thin, crisp wafers hugging silky, caramel-like arequipe.
- Sweet-salty twist with grated cheese and fruity brightness from preserves.
- Build-fast party treat; impressive yet totally doable.
Grocery List
- Produce: None required; optional fresh strawberries or bananas for serving.
- Dairy: Queso fresco or queso costeño; whole milk if making arequipe from scratch.
- Pantry: Oblea wafers; arequipe (dulce de leche); fruit preserves (guava, strawberry, or raspberry). For homemade: granulated sugar, baking soda, vanilla extract, all-purpose flour, cornstarch, powdered sugar, neutral oil, fine salt.
Full Ingredients
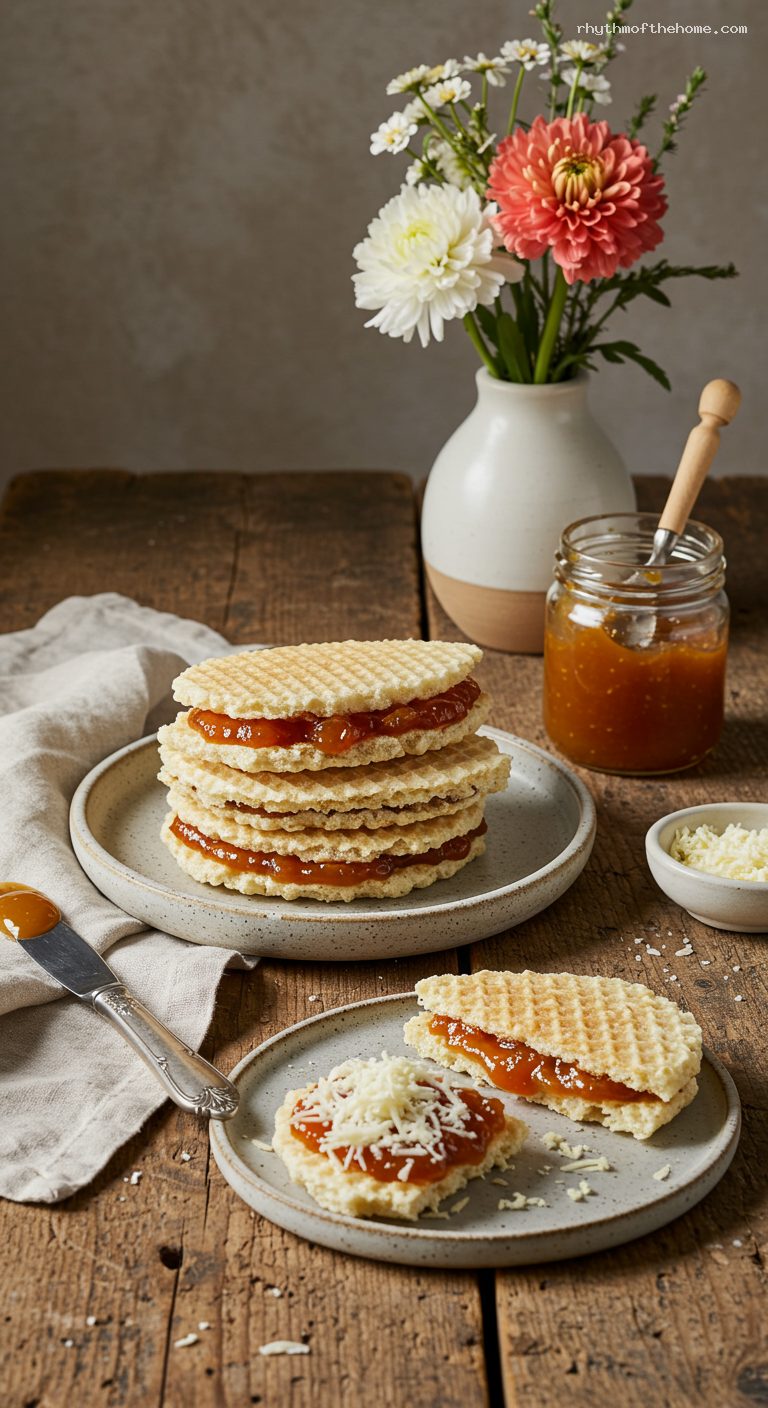
For Street-Style Assembly (8 sandwiches)
- 16 oblea wafers (5 to 6 inches each)
- 1 cup arequipe (dulce de leche), room temperature
- 1/2 cup finely grated queso fresco or queso costeño (optional but classic)
- 1/3 cup fruit preserves such as guava, strawberry, or raspberry (optional)
Homemade Arequipe (makes about 1 1/2 cups)
- 4 cups whole milk
- 1 1/4 cups granulated sugar
- 1/4 teaspoon baking soda
- 1 teaspoon vanilla extract
- Pinch of fine salt
Oven-Baked Paper-Thin Wafers (about 16 wafers, 5–6 inches)
- 1 large egg white (30 g)
- 1/2 cup powdered sugar (60 g), sifted
- 1/4 cup all-purpose flour (30 g), sifted
- 1/4 cup cornstarch (30 g), sifted
- 1/8 teaspoon fine salt
- 2 tablespoons neutral oil (such as sunflower or canola)
- 3 tablespoons cool water (plus 1–2 teaspoons more if needed)
Optional Extras for Serving
- Fresh strawberries or banana slices
- Powdered sugar for dusting
- Parchment squares for wrapping, street-style
Step-by-Step Instructions
Step 1: Make the arequipe (if going from scratch)
In a heavy 3-quart saucepan, combine 4 cups whole milk, 1 1/4 cups sugar, 1/4 teaspoon baking soda, a pinch of salt, and 1 teaspoon vanilla. Bring to a gentle simmer over medium heat, stirring until sugar dissolves, about 5 minutes. Reduce heat to low and cook at a steady simmer, stirring often with a heatproof spatula and scraping the bottom and sides, until thick, caramel-brown, and reduced to about 1 1/2 cups, 60–75 minutes. In the last 15 minutes, stir continuously to prevent scorching. For precision, the arequipe is ready at 220–225°F (104–107°C). Transfer to a heatproof jar to cool to room temperature; it will thicken as it cools.
Step 2: Bake paper-thin wafers (or use store-bought)
Heat oven to 325°F (163°C). Line two large baking sheets with silicone mats or parchment. Whisk 1 egg white until bubbly, then whisk in 1/2 cup powdered sugar until smooth. Sift in 1/4 cup flour, 1/4 cup cornstarch, and 1/8 teaspoon salt; whisk. Add 2 tablespoons oil and 3 tablespoons water; whisk to a thin, pourable batter. If needed, add water 1 teaspoon at a time until it ribbons off the spoon. Spoon 2 teaspoons batter onto the sheet and spread into a very thin 5–6 inch circle with an offset spatula or the back of a spoon. Repeat, leaving space. Bake 7–9 minutes until edges are just turning pale gold. Let cool 60 seconds, then slide to a rack. They will crisp fully as they cool. Repeat until you have 16 wafers.
Step 3: Set up your assembly line
Lay out 8 wafers on a clean board. Have arequipe at room temperature. If it is stiff, microwave in 5–10 second bursts until soft and spreadable. Place grated cheese and preserves within easy reach. Keep the remaining 8 wafers nearby for capping.
Step 4: Spread the arequipe
Using a small offset spatula or butter knife, spread 2 tablespoons arequipe onto each of the 8 base wafers, stopping 1/4 inch from the edge to prevent overflow. For a street-style look, swirl the surface so peaks and ribbons show through the top wafer.
Step 5: Add the optional fillings
Scatter about 1 tablespoon finely grated queso fresco or queso costeño over each wafer, then add a very thin line (about 1 teaspoon) of fruit preserves. Keep fillings light so the wafers stay crisp and the sandwich remains easy to bite.
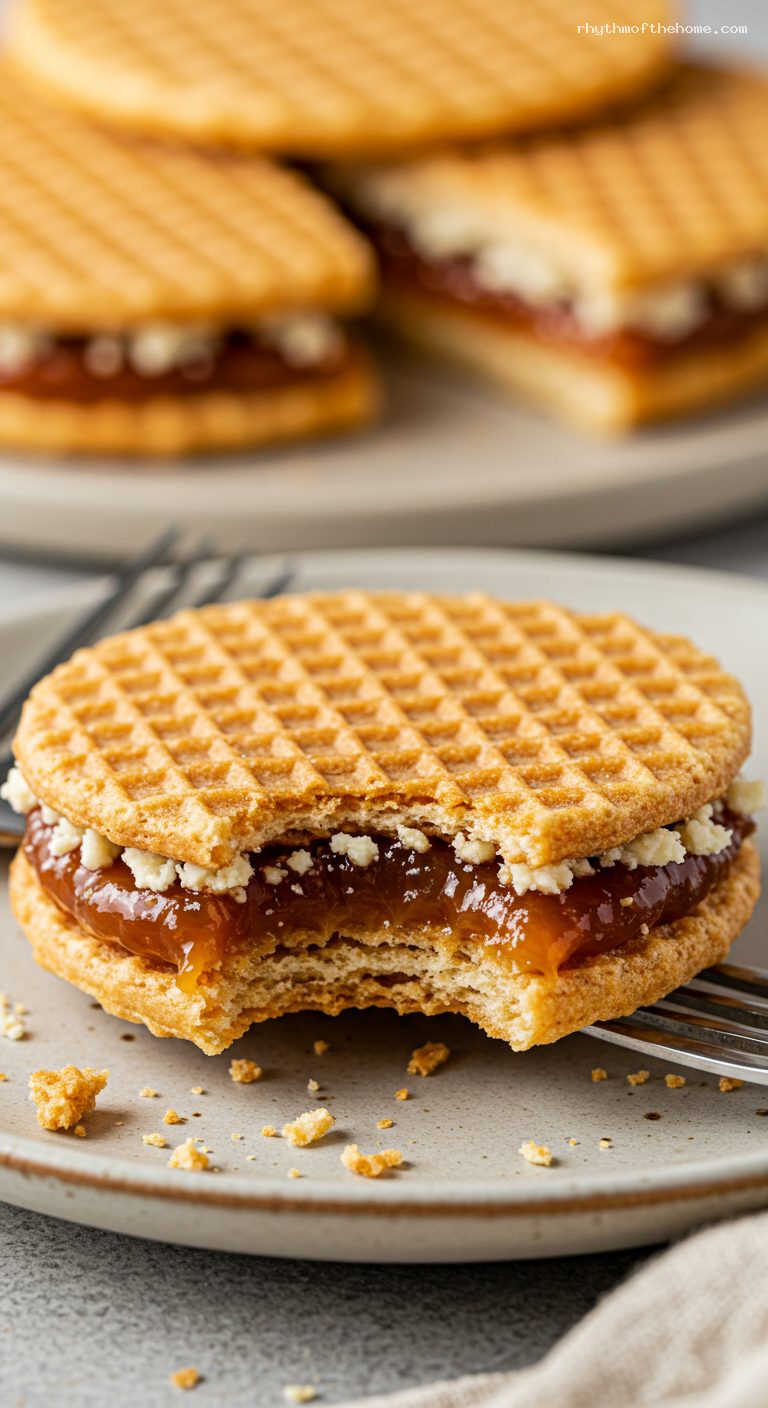
Step 6: Cap and press
Top each with a second wafer. Press gently but firmly with your palm for 10 seconds to adhere and distribute the filling evenly. If any arequipe squeezes out, use a knife to tidy the edges. Serve immediately while the wafers are ultra-crisp.
Step 7: Serve and wrap
Enjoy right away, or slide each oblea into a parchment sleeve for a true street-food feel. If adding fresh fruit, serve at once, as moisture softens wafers quickly.
Pro Tips
- Ultra-thin spreading is key for wafers: aim to see the mat or parchment faintly through the batter.
- Keep arequipe spreadable: if it thickens during assembly, warm it briefly (5–10 seconds in the microwave).
- Less is more with fillings: too much moisture (preserves or fresh fruit) will soften the wafers.
- Work quickly: assemble in small batches to keep wafers crisp.
- For perfectly round wafers, trace 5 1/2 inch circles on parchment as a guide, then flip parchment before spreading.
Variations
- Guava and Cheese: Arequipe + grated queso + thin stripe of guava paste or guava jam for a classic sweet-salty combo.
- Chocolate-Coffee: Arequipe whisked with 1 tablespoon cocoa powder and 1 teaspoon instant espresso; finish with shaved dark chocolate.
- Banana Cinnamon: Arequipe + paper-thin banana slices + a whisper of ground cinnamon; assemble and eat immediately.
Storage & Make-Ahead
Homemade arequipe keeps refrigerated up to 1 month in a sealed jar; warm gently to loosen before using. Homemade wafers keep 5–7 days in an airtight container with a silica gel packet or a few grains of dry rice to absorb moisture. Store-bought obleas keep as directed on the package. Assembled obleas are best within 10 minutes; if needed, hold up to 1 hour at room temperature. Avoid refrigeration after assembling—the wafers soften quickly. For make-ahead entertaining, prep all components and assemble right before serving.
Nutrition (per serving)
Approximate for 1 oblea sandwich with 2 tablespoons arequipe, no add-ins: 190 calories; 4 g fat; 35 g carbohydrates; 1 g fiber; 26 g sugars; 3 g protein; 140 mg sodium. Add-ins will vary nutrition.

Leave a Reply