
Quick Recipe Version (TL;DR)
Quick Ingredients
- 10 oz (about 8 cups) sturdy tortilla chips
- 1 (15 oz) can black beans, drained and rinsed
- 2 cups (8 oz) shredded cheese (cheddar, Monterey Jack, or a blend)
- 1 1/2 cups cooked shredded chicken or cooked taco-seasoned ground meat
- 1 cup salsa
- 1/4 cup sliced pickled jalapeños (or fresh)
- 1/2 cup sour cream
- 1 large avocado, diced (or 1 cup diced avocado)
Do This
- 1) Heat oven to 425°F and set a rack in the middle.
- 2) Spread chips on a large sheet pan (about 18 x 13 inches).
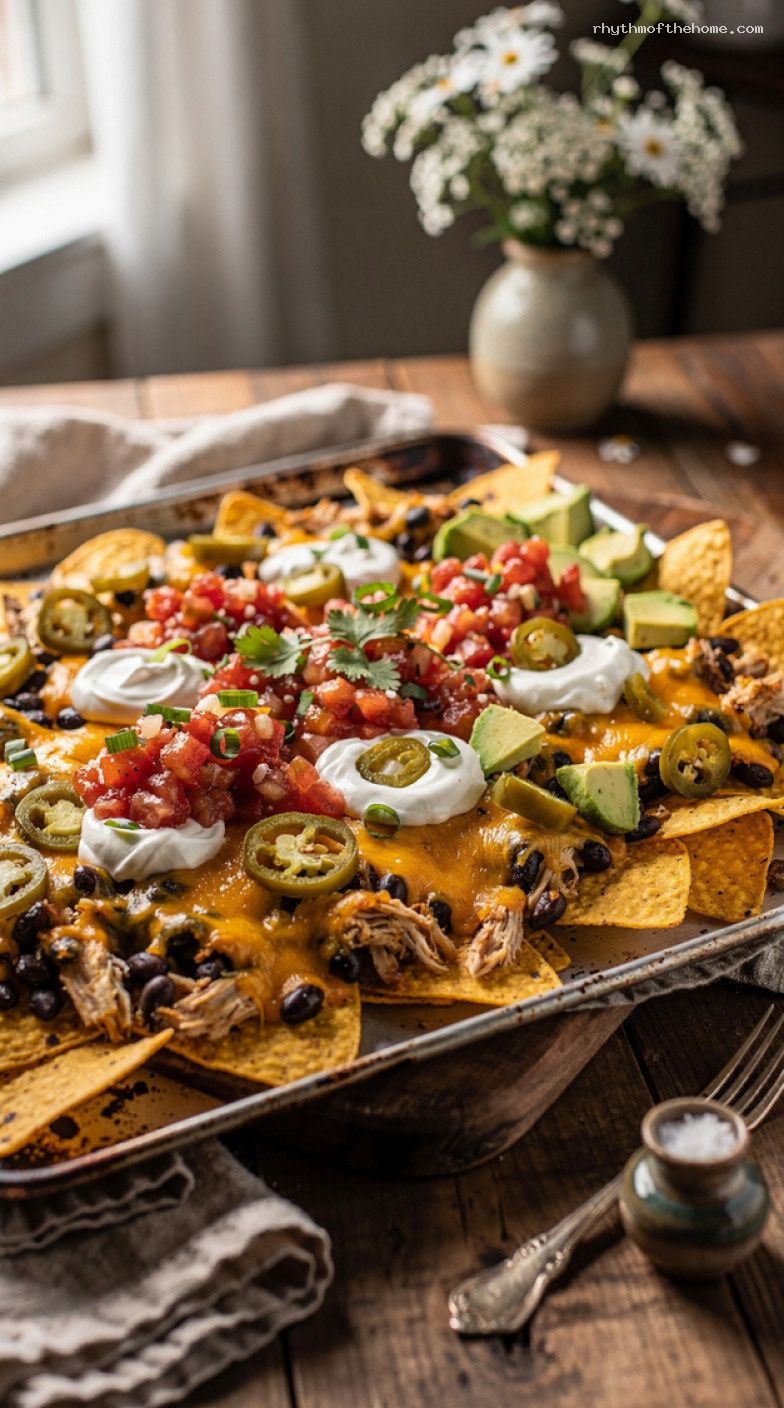
- 3) Scatter black beans and chicken/taco meat evenly over chips.
- 4) Sprinkle cheese over everything (focus on the center where chips overlap).
- 5) Bake 8–10 minutes until cheese is fully melted and bubbling at the edges.
- 6) Top immediately with salsa, jalapeños, sour cream, and diced avocado.
- 7) Serve right away while hot and crunchy.
Why You’ll Love This Recipe
- Fast, flexible, and perfect for using up leftover chicken or taco meat.
- Sheet-pan method means big flavor with minimal dishes.
- Customizable for picky eaters: everyone can add their own toppings.
- Great game-night or “what’s for dinner?” solution in under 20 minutes.
Grocery List
- Produce: 1 large avocado; optional lime; optional cilantro; optional green onions
- Dairy: shredded cheese (cheddar, Monterey Jack, or blend); sour cream
- Pantry: tortilla chips; 1 can black beans; salsa; pickled jalapeños; optional hot sauce
Full Ingredients
Nacho Base
- 10 oz (about 8 cups) sturdy tortilla chips (thicker chips hold up best)
- 1 (15 oz) can black beans, drained and rinsed
- 1 1/2 cups cooked shredded chicken or cooked taco-seasoned ground meat (warm or room temp is fine)
- 2 cups (8 oz) shredded cheese (cheddar, Monterey Jack, pepper Jack, or a blend)
Loaded Toppings (After Baking)
- 1 cup salsa (chunky salsa or restaurant-style both work)
- 1/4 cup sliced pickled jalapeños (or thinly sliced fresh jalapeño)
- 1/2 cup sour cream
- 1 large avocado, diced (about 1 cup)
Optional Finishing Touches
- 1 tablespoon lime juice (about 1/2 lime), for squeezing over the top
- 2 tablespoons chopped cilantro
- 2 tablespoons thinly sliced green onions
- Hot sauce, to taste
Step-by-Step Instructions
Step 1: Preheat the oven and prep your pan
Preheat the oven to 425°F with a rack in the middle. Use a large rimmed sheet pan (about 18 x 13 inches) so nothing slides off when you pull it out of the oven.
If your sheet pan tends to stick, you can line it with parchment paper for easier cleanup (not required, but helpful).
Step 2: Build the chip layer
Spread the tortilla chips in an even layer across the sheet pan. It’s okay if there’s some overlap, but avoid huge piles—those spots can stay un-melty in the center.
Tip: If your chips are delicate, choose the thickest ones in the bag for the bottom layer.
Step 3: Add beans and meat
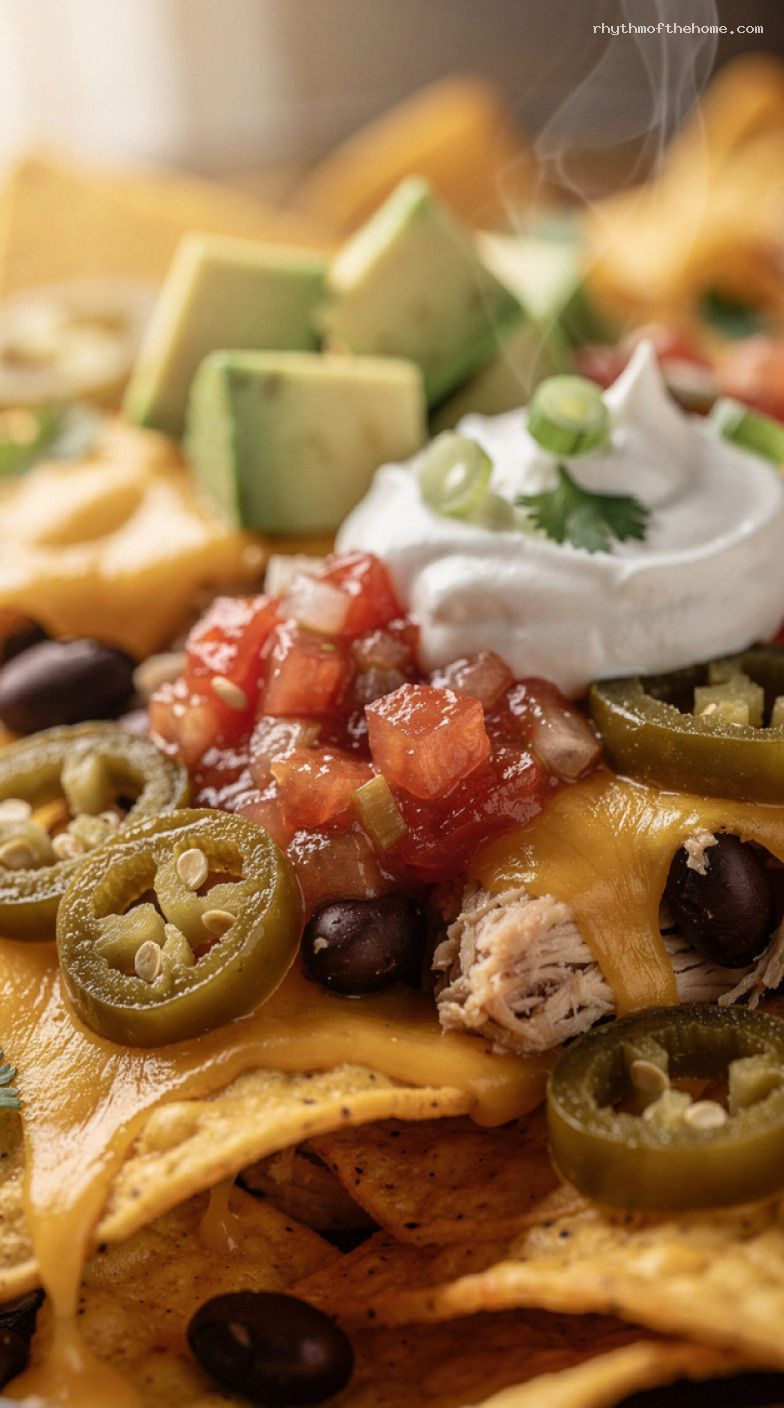
Scatter the drained, rinsed black beans evenly over the chips. Add the cooked shredded chicken or taco meat on top, distributing it so every section gets a little.
If your meat is cold straight from the fridge, break it up into smaller pieces so it warms quickly and heats through during baking.
Step 4: Cover with cheese (strategically)
Sprinkle the shredded cheese over the entire tray. Aim for generous coverage, especially across the middle where chips overlap—this helps “glue” the nachos together and reduces dry spots.
Step 5: Bake until melted and bubbling
Bake for 8–10 minutes, or until the cheese is fully melted and you see a little bubbling around the edges. Keep a close eye in the last 2 minutes; chips can go from perfect to too-toasty quickly.
Remove the tray from the oven and let it sit for 1 minute to settle.
Step 6: Add the cold toppings right away
Spoon the salsa over the hot nachos (a few spoonfuls across the tray is better than soaking one spot). Scatter jalapeños on top.
Dollop sour cream over the tray (a spoon works, or put sour cream in a zip-top bag, snip a corner, and drizzle). Finish with diced avocado.
Step 7: Finish, serve, and enjoy
If you like, squeeze lime juice over the top and sprinkle with cilantro or green onions. Serve immediately while the chips are crunchy and the cheese is stretchy.
For easiest sharing, set the sheet pan on a trivet in the middle of the table and let everyone dig in.
Pro Tips
- Use sturdy chips: Thick, restaurant-style tortilla chips hold toppings without turning soggy as quickly.
- Drain toppings well: Rinse and drain beans thoroughly; watery beans make the tray soft.
- Layer for coverage: If you want maximum “loaded” bites, do two thin layers: half the chips, half the beans/meat/cheese, then repeat.
- Don’t bake salsa or sour cream: Add fresh, cold toppings after baking so flavors stay bright and textures stay creamy.
- Customize heat: Pickled jalapeños are tangy and medium; fresh jalapeños are brighter and can be hotter.
Variations
- Vegetarian loaded nachos: Skip the meat and add 1 cup drained canned corn and 1/2 cup diced bell pepper. Keep bake time the same.
- Extra-crispy nachos: Bake the chips alone for 3 minutes at 425°F, then add beans/meat/cheese and bake 8 minutes more.
- BBQ chicken nachos: Toss 1 1/2 cups shredded chicken with 2 tablespoons BBQ sauce before adding. Top with salsa plus thinly sliced red onion after baking.
Storage & Make-Ahead
Nachos are best eaten immediately. If you expect leftovers, keep toppings separate: store cooked meat and beans in airtight containers in the refrigerator for up to 3 days. Store salsa, jalapeños, sour cream, and diced avocado separately (avocado is best cut fresh; if needed, toss with 1 teaspoon lime juice and press plastic wrap directly onto the surface for up to 24 hours).
To reheat: spread leftover chips (preferably ones without sour cream/avocado) on a sheet pan and bake at 400°F for 5–7 minutes. Add fresh toppings after reheating.
Nutrition (per serving)
Approximate, based on 6 servings: 520 calories; 24 g protein; 48 g carbohydrates; 26 g fat; 8 g fiber; 900 mg sodium.

Leave a Reply