
Quick Recipe Version (TL;DR)
Quick Ingredients
- 2 1/2 cups (300 g) all-purpose flour
- 2 tbsp (12 g) natural unsweetened cocoa powder
- 1 tsp baking soda, 1 tsp fine salt
- 2 cups (400 g) granulated sugar
- 1 1/4 cups (300 ml) neutral oil
- 3 large eggs, room temperature
- 1 cup (240 ml) buttermilk, room temperature
- 2 tsp vanilla extract
- 2 tbsp (30 ml) red liquid food coloring (or 2 tsp gel)
- 2 tsp white vinegar
- 16 oz (450 g) cream cheese
- 1 1/2 cups (180 g) powdered sugar
- 2 cups (480 ml) cold heavy cream
- 2 tsp vanilla, pinch of salt, 1–2 tsp lemon juice (optional)
- Fresh berries and cake crumbs for garnish (optional)
Do This
- 1. Preheat oven to 350°F (175°C). Grease, flour, and line three 8-inch round cake pans with parchment.
- 2. Whisk flour, cocoa, baking soda, and salt in one bowl. In another bowl, whisk sugar, oil, eggs, buttermilk, vanilla, food coloring, and vinegar until smooth.
- 3. Add dry ingredients to wet in two additions, whisking gently just until a smooth, vividly red batter forms.
- 4. Divide batter evenly among pans and bake 22–26 minutes, until a toothpick comes out with a few moist crumbs. Cool completely.
- 5. For frosting, beat cream cheese and powdered sugar until smooth, then beat in vanilla, salt, and lemon juice. Slowly whip in cold heavy cream until thick, fluffy, and spreadable.
- 6. Level cooled cake layers if needed. Place one layer on a stand, spread frosting, and repeat with remaining layers.
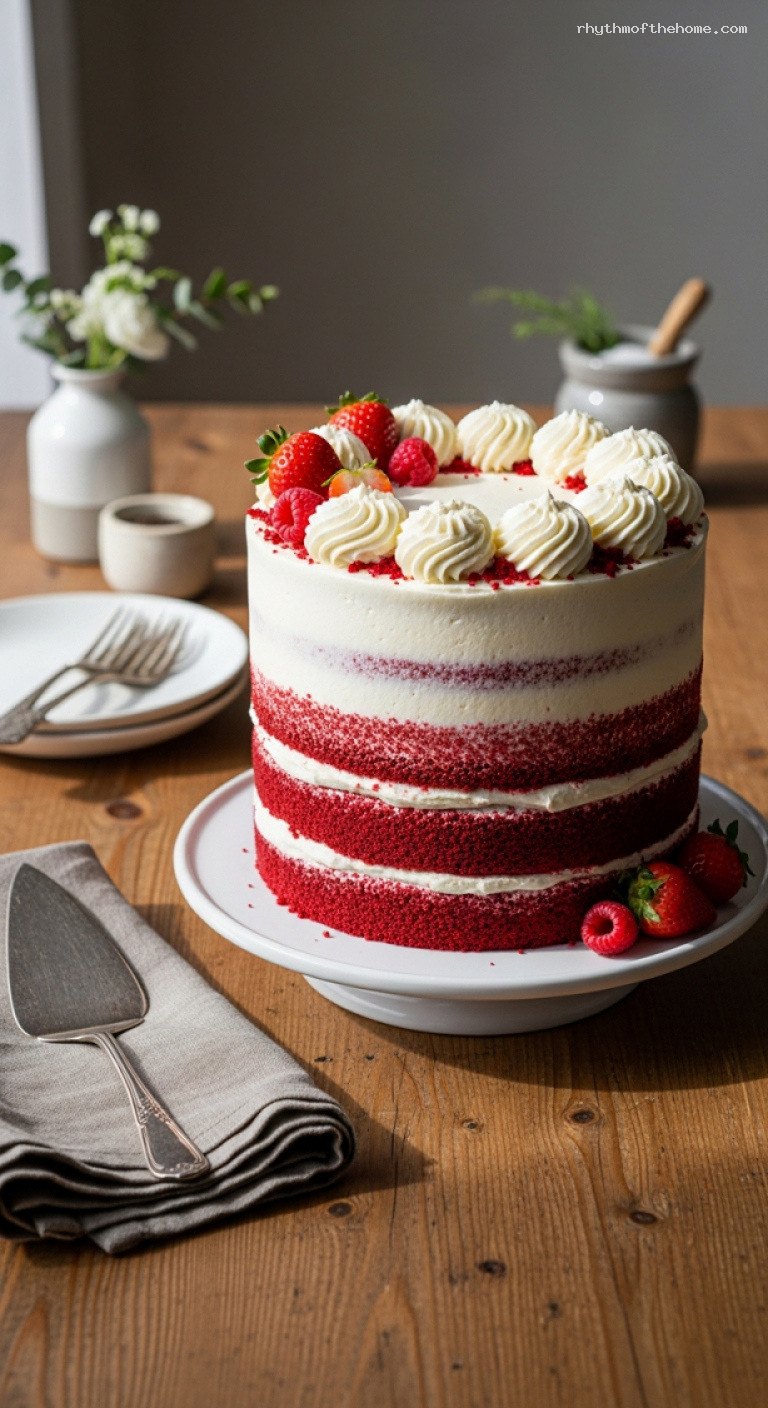
- 7. Frost top and sides, smoothing or swirling. Garnish with cake crumbs and fresh berries. Chill at least 30 minutes before slicing.
Why You’ll Love This Recipe
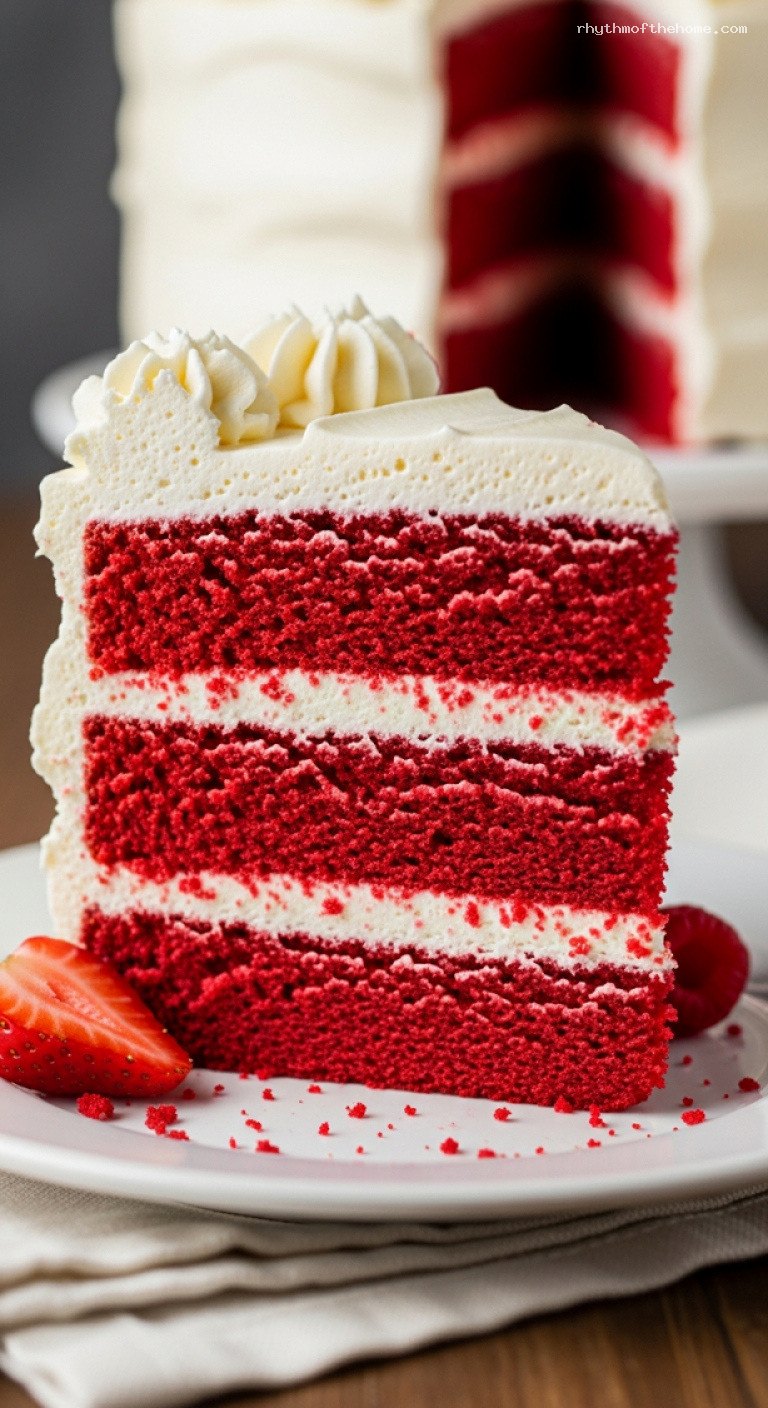
- Moist, tender layers with just enough cocoa to balance the sweetness and highlight the red color.
- Whipped cream-cheese frosting that is tangy, cloud-light, and not overly sweet.
- Striking crimson-and-cream layers that slice beautifully for birthdays, holidays, or special dinners.
- Step-by-step instructions tailored for home cooks, with make-ahead and storage tips built in.
Grocery List
- Produce: 1 large lemon (optional, for frosting), fresh berries for garnish (optional)
- Dairy: Buttermilk, cream cheese (brick-style, full fat), heavy cream (whipping cream), unsalted butter (for greasing pans, optional)
- Pantry: All-purpose flour, granulated sugar, powdered sugar, natural unsweetened cocoa powder, baking soda, fine salt, vanilla extract, red food coloring, white vinegar, neutral oil (canola/vegetable), nonstick spray or extra flour for pans
Full Ingredients
For the Red Velvet Cake Layers
- 2 1/2 cups (300 g) all-purpose flour, spooned and leveled
- 2 tbsp (12 g) natural unsweetened cocoa powder (not Dutch-processed)
- 1 tsp baking soda
- 1 tsp fine sea salt (or table salt)
- 2 cups (400 g) granulated sugar
- 1 1/4 cups (300 ml) neutral oil (such as canola or vegetable)
- 3 large eggs, at room temperature
- 1 cup (240 ml) buttermilk, at room temperature
- 2 tsp pure vanilla extract
- 2 tbsp (30 ml) red liquid food coloring or 2 tsp red gel food coloring, more as needed for a deep crimson
- 2 tsp white vinegar (or apple cider vinegar)
- Butter or nonstick spray and a little extra flour or cocoa powder, for the pans
For the Tangy Whipped Cream-Cheese Frosting
- 16 oz (450 g) full-fat brick cream cheese, softened to cool room temperature
- 1 1/2 cups (180 g) powdered sugar, sifted
- 2 tsp pure vanilla extract
- 1–2 tsp fresh lemon juice (optional, for extra tang)
- Pinch of fine salt
- 2 cups (480 ml) very cold heavy cream (whipping cream)
To Assemble & Garnish
- A few tablespoons of frosting for a crumb coat (from above batch)
- Reserved cake crumbs from leveling the layers (optional, for decorating)
- Fresh berries (such as raspberries or strawberries), for serving (optional)
Step-by-Step Instructions
Step 1: Prepare the pans and preheat the oven
Set your oven rack in the middle position and preheat the oven to 350°F (175°C). Grease three 8-inch (20 cm) round cake pans with butter or nonstick spray. Line the bottoms with rounds of parchment paper, then lightly grease the parchment as well. Dust the sides of the pans with a little flour or cocoa powder, tapping out any excess. Properly prepared pans help the cakes release cleanly and keep those layers neat and tall.
Step 2: Mix the dry ingredients
In a medium bowl, whisk together the flour, cocoa powder, baking soda, and salt until well combined and lump-free. This not only distributes the leavening and cocoa evenly but also helps keep the batter smooth without overmixing later. Set the dry mixture aside.
Step 3: Whisk the wet ingredients
In a large mixing bowl, add the granulated sugar and oil. Whisk until the mixture looks slightly thickened and glossy. Add the eggs one at a time, whisking well after each addition until the batter is smooth and slightly lighter in color. Whisk in the buttermilk, vanilla, red food coloring, and vinegar until everything is completely combined and the color is a uniform, rich red. Adjust the food coloring now if you want a deeper shade; the cocoa added later will mute the color slightly.
Step 4: Combine into a smooth crimson batter
Sprinkle half of the dry ingredient mixture over the wet ingredients. Whisk gently until nearly combined, then add the remaining dry ingredients and whisk just until you no longer see streaks of flour. Scrape around the bottom and sides of the bowl with a spatula to make sure nothing is hiding. The batter should be smooth, pourable, and vividly crimson. Avoid overmixing at this stage; mixing just until combined helps keep the cake tender and soft.
Step 5: Bake the cake layers
Divide the batter evenly among the three prepared pans. An easy way is to use a kitchen scale or a measuring cup to portion the batter (each pan will hold about 2 to 2 1/4 cups of batter). Smooth the tops gently with a spatula.
Place the pans in the preheated oven (on the same rack if they fit comfortably; otherwise, rotate halfway through baking). Bake for 22–26 minutes, or until the cakes spring back lightly when touched and a toothpick inserted into the center comes out with a few moist crumbs but no wet batter. Remove the pans from the oven and let the cakes cool in their pans on a wire rack for 10–15 minutes. Then run a thin knife around the edges, turn the cakes out onto the racks, peel off the parchment, and cool completely, about 45–60 minutes.
Step 6: Level the layers and prepare for frosting
Once the cakes are completely cool, check their tops. If they domed in the oven, use a long serrated knife to gently level the tops so they are flat. Keep any tasty trimmings; crumble them with your fingers to make fine red cake crumbs for decorating later. If you have time, wrap each cooled layer in plastic wrap and refrigerate for 30 minutes. Slightly chilled cakes are easier to handle and less crumbly when you frost them.
Step 7: Make the tangy whipped cream-cheese frosting
In a large bowl, add the softened cream cheese and sifted powdered sugar. Using a hand mixer or stand mixer fitted with the paddle attachment, beat on medium speed until completely smooth, creamy, and free of lumps, about 2–3 minutes. Scrape down the sides of the bowl as needed. Add the vanilla, lemon juice (if using), and a pinch of salt, and mix to combine.
Switch to the whisk attachment if using a stand mixer. With the mixer running on medium speed, slowly stream in the very cold heavy cream. As you add the cream, the mixture will first look loose, then begin to thicken. Once all the cream is added, increase the speed to medium-high and whip just until the frosting becomes thick, fluffy, and holds medium-stiff peaks, 1–3 minutes. Do not overwhip, or the frosting can become grainy. If it seems too soft to spread, chill it for 15–20 minutes to firm slightly.
Step 8: Fill, stack, and decorate the cake
Place a small dollop of frosting in the center of your serving plate or cake stand to anchor the cake. Set the first cake layer on top, cut side up if you leveled it. Spread about 3/4 to 1 cup of frosting over the layer, pushing it gently to the edges. Place the second layer on top, again cut side up, and repeat with another layer of frosting. Top with the final cake layer, cut side down so the top is perfectly flat.
Spread a thin layer of frosting over the top and sides of the cake to create a “crumb coat,” sealing in any loose crumbs. Chill the cake for 20–30 minutes until this layer firms up slightly. Then apply the remaining frosting more generously, smoothing it with an offset spatula for a clean look or swirling it for a rustic finish. Decorate the bottom edge and/or top rim with the reserved red cake crumbs, and add fresh berries on top if you like. Chill the finished cake for at least 30 minutes to set the frosting before slicing clean, dramatic slices.
Pro Tips
- Measure flour correctly: Spoon flour into your measuring cup and level it off with a knife, or use a scale. Too much flour is the fastest way to a dry cake.
- Use room-temperature ingredients: Let eggs and buttermilk sit out for 30–45 minutes. They blend more easily and help create a fine, even crumb.
- Chill before frosting: Slightly chilled cake layers shed fewer crumbs, making it much easier to get those clean sides and sharp layers.
- Control the color: Natural cocoa powder is less dark than Dutch-processed and keeps the red brighter. If your batter looks dull, add a few extra drops of food coloring before baking.
- Watch the frosting closely: Stop whipping the cream-cheese frosting as soon as it becomes thick and fluffy. Overwhipping can cause it to look curdled or grainy.
Variations
- Red Velvet Cupcakes: Divide the batter among 24 lined muffin cups (about 2/3 full) and bake at 350°F (175°C) for 18–20 minutes. Pipe the whipped cream-cheese frosting on top.
- Simple Sheet Cake: Bake the batter in a greased 9×13-inch pan for 30–35 minutes. Cool completely, then frost the top with a thick layer of whipped cream-cheese frosting and sprinkle with cake crumbs.
- Pink Velvet: Use half the red coloring for a softer blush-pink cake and add an extra teaspoon of vanilla for a more delicate flavor.
Storage & Make-Ahead
Because the frosting contains cream cheese and whipped cream, this cake should be stored in the refrigerator. Cover the finished cake with a cake dome or wrap loosely in plastic wrap and refrigerate for up to 3–4 days. For the best flavor and texture, let slices sit at room temperature for 20–30 minutes before serving so the cake softens and the frosting becomes silky.
You can make the cake layers up to 2 days ahead: once fully cool, wrap each layer tightly in plastic and refrigerate, or freeze for up to 2 months. If frozen, thaw wrapped layers in the fridge overnight, then bring to cool room temperature before assembling. The whipped cream-cheese frosting is best made the day you plan to assemble the cake; it can be kept covered and chilled for up to 24 hours, then re-whipped briefly on low speed if it softens.
Nutrition (per serving)
Approximate values for 1 of 12 slices: about 650 calories; 36 g fat; 23 g saturated fat; 79 g carbohydrates; 1 g fiber; 58 g sugars; 7 g protein; 420 mg sodium. Actual values will vary based on specific ingredients and portion sizes.

Leave a Reply