
Quick Recipe Version (TL;DR)
Quick Ingredients
- 1 1/2 cups (150 g) chocolate cookie crumbs
- 5 tbsp (70 g) unsalted butter, melted, plus 3/4 cup (170 g) softened
- 2 tbsp (25 g) granulated sugar + 1 cup (200 g) granulated sugar
- 6 oz (170 g) bittersweet or semisweet chocolate (60–70%), chopped
- 4 large pasteurized eggs, at room temperature
- 3 1/2 tsp vanilla extract, divided
- 1/4 tsp fine salt
- 1 1/2 cups (360 ml) heavy cream, cold
- 3 tbsp (24 g) powdered sugar
- Chocolate curls or shavings, berries, and/or mint for garnish (optional)
Do This
- 1. Heat oven to 350°F (175°C). Mix cookie crumbs, 2 tbsp sugar, pinch of salt, and 5 tbsp melted butter. Press into a 9-inch pie plate. Bake 10 minutes; cool completely.
- 2. Melt chopped chocolate gently in a heatproof bowl over barely simmering water or in short microwave bursts; stir smooth and let cool to lukewarm.
- 3. Beat 3/4 cup softened butter with 1 cup sugar until very light and fluffy, about 5 minutes. Beat in cooled chocolate, 2 tsp vanilla, and salt.
- 4. Add eggs one at a time, beating a full 5 minutes after each addition on medium-high speed until the mixture is thick, silky, and airy (about 20 minutes total).
- 5. Spread chocolate silk filling into cooled crust, smooth the top, cover, and chill at least 6 hours or overnight until set.
- 6. Whip heavy cream with powdered sugar and 1 1/2 tsp vanilla to medium-firm peaks. Pipe or dollop on chilled pie, garnish with chocolate curls, slice, and serve cold.
Why You’ll Love This Recipe
- Ultra-smooth, mousse-like chocolate filling that truly tastes like silk.
- Crisp, chocolatey cookie crust that contrasts beautifully with the airy interior.
- Swirls of softly sweet whipped cream and chocolate curls that look bakery-worthy but are easy to do at home.
- Perfect make-ahead dessert for holidays, dinner parties, and celebrations.
Grocery List
- Produce: Fresh berries and mint sprigs for garnish (optional)
- Dairy: Unsalted butter, heavy whipping cream, pasteurized large eggs
- Pantry: Chocolate wafer or sandwich cookies, bittersweet or semisweet chocolate, granulated sugar, powdered sugar, vanilla extract, fine salt
Full Ingredients
Chocolate Cookie Crust
- 1 1/2 cups (150 g) finely crushed chocolate cookie crumbs (from about 20 chocolate wafer cookies or 22–24 chocolate sandwich cookies)
- 5 tbsp (70 g) unsalted butter, melted
- 2 tbsp (25 g) granulated sugar
- Pinch of fine sea salt
Chocolate Silk Filling
- 6 oz (170 g) bittersweet or semisweet chocolate, 60–70% cacao, finely chopped
- 3/4 cup (170 g) unsalted butter, softened to cool room temperature
- 1 cup (200 g) granulated sugar (superfine if you have it)
- 4 large pasteurized eggs, at room temperature
- 2 tsp pure vanilla extract
- 1/4 tsp fine sea salt
Whipped Cream Topping
- 1 1/2 cups (360 ml) heavy whipping cream, very cold
- 3 tbsp (24 g) powdered sugar
- 1 1/2 tsp pure vanilla extract
Optional Garnishes
- Chocolate curls or shavings (from about 1 oz / 30 g chocolate)
- Fresh berries (raspberries or strawberries work nicely)
- Small mint sprigs
Step-by-Step Instructions
Step 1: Prepare your pan and ingredients
Lightly grease a 9-inch (23 cm) pie dish with a thin swipe of butter. This helps the crust release cleanly but should be almost invisible. Set aside.
Bring the 3/4 cup (170 g) butter for the filling and the eggs out of the refrigerator so they can come to room temperature while you make the crust. The butter should be soft but not greasy, and the eggs should lose their chill for the best volume later.
Preheat your oven to 350°F (175°C) and place an oven rack in the center position.
Step 2: Make and bake the chocolate cookie crust
In a medium bowl, combine the chocolate cookie crumbs, 2 tbsp (25 g) granulated sugar, and a pinch of fine sea salt. Pour in the 5 tbsp (70 g) melted butter and stir with a fork until all crumbs are evenly moistened and look like damp sand. If you squeeze a handful, it should hold together.
Transfer the mixture to the prepared pie dish. Use your fingers and the flat bottom of a measuring cup or glass to firmly press the crumbs into an even layer across the bottom and up the sides. Take time to press well; a firmly packed crust bakes up crisp rather than crumbly.
Bake the crust for 10 minutes, until it looks set and smells fragrant. Remove from the oven and let it cool completely on a wire rack before adding the filling. A warm crust will melt the filling and ruin its airy texture.
Step 3: Melt the chocolate
Place the chopped chocolate in a heatproof bowl. Set the bowl over a small saucepan of barely simmering water, making sure the bottom of the bowl does not touch the water (a gentle double boiler). Stir frequently until the chocolate is just melted and smooth. Alternatively, melt in the microwave in 15–20 second bursts, stirring between each, until just melted.
Remove the bowl from the heat and let the chocolate cool, stirring occasionally, until it is lukewarm but still fluid. If it is hot when added to the butter mixture, it can melt the butter and deflate the filling; if it is too cool, it can seize and turn grainy.
Step 4: Cream the butter and sugar until fluffy
In a large mixing bowl (a stand mixer with the paddle or whisk attachment works best), beat the softened 3/4 cup (170 g) butter on medium speed for about 1 minute to smooth it out. Add the 1 cup (200 g) granulated sugar gradually, then increase the speed to medium-high and beat for 4–5 minutes, scraping down the bowl once or twice.
The mixture should become noticeably lighter in color and very fluffy, with some of the sugar beginning to dissolve. This step is important for the ultra-smooth texture of the finished pie, so do not rush it.
Pour in the cooled melted chocolate, 2 tsp vanilla extract, and 1/4 tsp salt. Beat on medium speed just until fully combined and glossy, scraping the bowl to ensure no streaks of butter remain.
Step 5: Beat in the eggs for a silky, airy filling
Switch to the whisk attachment if using a stand mixer. Add one room-temperature egg to the chocolate mixture and beat on medium-high speed for a full 5 minutes. The mixture will gradually lighten, thicken, and increase in volume as air is incorporated and the sugar continues to dissolve.
Repeat with the remaining eggs, adding them one at a time and beating for 5 full minutes after each addition. This means at least 20 minutes of total mixing time, which is the secret to the silky, mousse-like texture. Scrape down the sides and bottom of the bowl between additions as needed to ensure everything is evenly whipped.
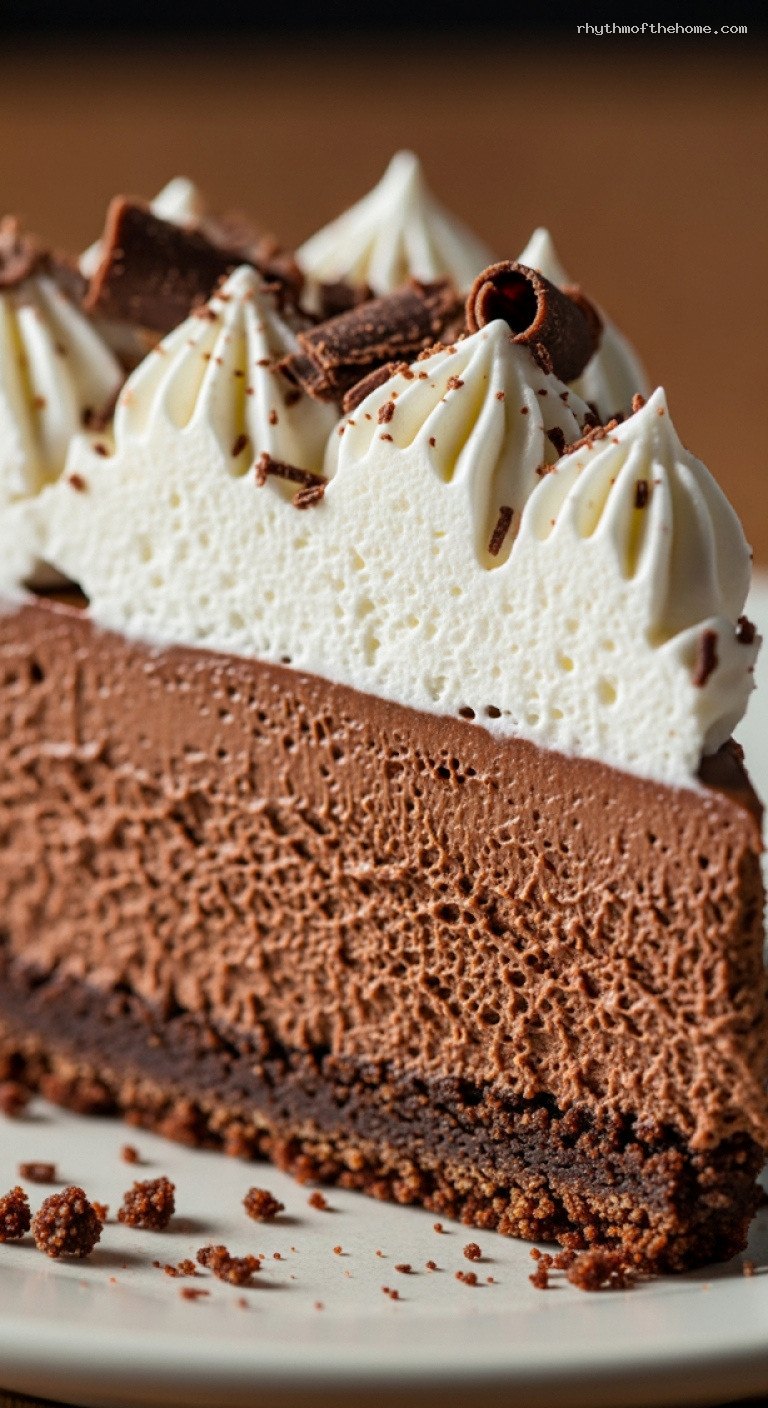
By the end, the filling should be very smooth, creamy, and slightly fluffy, with a satiny sheen and no graininess when rubbed between your fingers.
Note: This recipe traditionally uses eggs that are not cooked. For food safety, use pasteurized eggs and avoid serving to anyone with a compromised immune system or pregnant individuals unless your eggs are pasteurized and handled safely.
Step 6: Fill the crust and chill until set
Once the crust is completely cool, pour the chocolate silk filling into the pie shell. Use an offset spatula or the back of a spoon to gently spread it into an even layer, creating soft swirls or a smooth, flat top as you prefer.
Cover the pie loosely with plastic wrap, ensuring it does not touch the surface (you can insert a few toothpicks around the edge as supports if needed). Chill in the refrigerator for at least 6 hours, but preferably overnight. The filling will firm up while remaining mousse-like and sliceable.
Step 7: Whip the cream, garnish, and serve
When you are ready to serve, make the whipped cream. In a chilled mixing bowl, combine the cold heavy cream, 3 tbsp (24 g) powdered sugar, and 1 1/2 tsp vanilla extract. Whip with a hand mixer or whisk on medium-high speed until medium-firm peaks form: the cream should hold its shape but still look soft and smooth, not stiff or grainy.
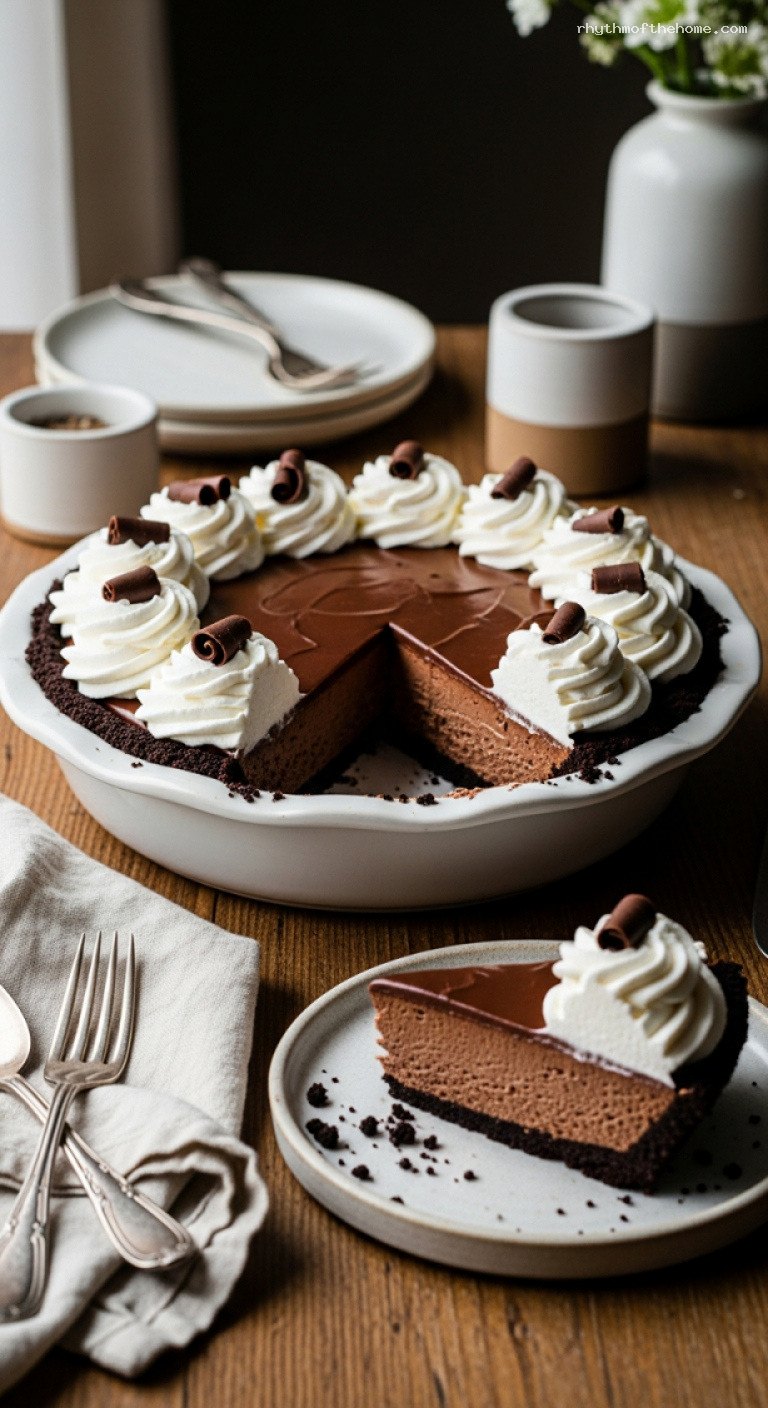
Spread the whipped cream over the entire surface of the chilled pie, or pipe it in decorative swirls around the edges using a piping bag fitted with a star tip for a bakery-style look.
For extra elegance, use a vegetable peeler to shave curls from a bar of chocolate directly over the pie, or sprinkle with finely chopped chocolate. Add a few fresh berries and mint sprigs if using.
Slice the pie with a thin, sharp knife. For the cleanest slices, dip the knife in hot water and wipe it dry between cuts. Serve the pie well-chilled and enjoy the contrast of crisp crust, silky chocolate, and cloud-like whipped cream.
Pro Tips
- Use pasteurized eggs: Because the filling is not baked, pasteurized shell eggs or liquid whole eggs labeled as pasteurized are the safest choice.
- Room temperature ingredients matter: Soft butter and room-temperature eggs whip up with the most volume and yield the smoothest texture. Cold eggs tend to make the filling dense and streaky.
- Do not rush the mixing time: The 20 minutes of beating after adding the eggs is what creates the silk-like, airy texture. Set a timer and let the mixer do the work.
- Cool the crust completely: Even slight warmth can start to melt the filling and collapse its structure. If you are in a hurry, pop the crust into the fridge or freezer to cool fully.
- Chill thoroughly before serving: Six hours is the minimum; overnight is even better for clean slices and fully developed flavor.
Variations
- Mocha Silk Pie: Stir 1–2 tsp instant espresso powder into the melted chocolate before adding it to the butter mixture. Top the whipped cream with a light dusting of cocoa powder and espresso powder.
- Classic Pastry Crust: Swap the chocolate cookie crust for a fully baked, cooled all-butter pie crust if you prefer a lighter, flaky base instead of a crumb crust.
- Mini Silk Pies: Press the crumb crust into 8–10 individual tart pans or a muffin tin lined with paper cups. Fill and chill as directed, then top each mini pie with a rosette of whipped cream.
Storage & Make-Ahead
This chocolate silk pie is an excellent make-ahead dessert. The fully assembled pie (without whipped cream) can be covered and refrigerated for up to 3 days. Add the whipped cream and garnishes within a few hours of serving for the best texture.
Leftover pie with whipped cream will keep in the refrigerator for 2–3 days. The crust may soften slightly over time, but the flavors remain delicious. For longer storage, you can freeze individual slices (without whipped cream) tightly wrapped for up to 1 month. Thaw in the refrigerator overnight, then top with freshly whipped cream before serving.
Nutrition (per serving)
Approximate values per serving (1/8 of the pie): about 730 calories; 55 g fat; 52 g carbohydrates; 10 g protein; 1–2 g fiber; 40 g sugars; 350–400 mg sodium. These numbers are estimates and will vary based on the exact brands and ingredients you use.

Leave a Reply