
Quick Recipe Version (TL;DR)
Quick Ingredients
- 2 cups (260 g) all-purpose flour
- 3/4 cup (75 g) unsweetened cocoa powder
- 1 1/4 tsp baking soda, 1 tsp baking powder, 1/2 tsp fine salt
- 1/2 cup (115 g) unsalted butter, softened
- 1 cup (200 g) granulated sugar
- 1 large egg, 2 tsp vanilla extract
- 1 cup (240 ml) buttermilk, room temperature
- 1 cup (225 g) unsalted butter, softened (for filling)
- 2 cups (240 g) powdered sugar
- 2 cups (about 200 g) marshmallow creme/fluff
- 1 tsp vanilla, pinch of salt, 2–3 tbsp milk or cream
Do This
- 1. Heat oven to 350°F (175°C). Line 2 baking sheets with parchment.
- 2. Whisk flour, cocoa, baking soda, baking powder, and salt in a bowl.
- 3. Cream butter and sugar until fluffy. Beat in egg and vanilla, then buttermilk.
- 4. Mix dry ingredients into wet just until a thick, smooth batter forms.
- 5. Scoop 2-tablespoon mounds onto sheets, spacing well. Bake 10–12 minutes until set and springy. Cool completely.
- 6. For filling, beat butter until creamy, then add powdered sugar, marshmallow creme, vanilla, salt, and enough milk/cream to make it fluffy and spreadable.
- 7. Match cake rounds by size. Pipe or spread filling on the flat side of half, top with remaining halves, and gently twist to sandwich.
Why You’ll Love This Recipe
- Soft, cake-like chocolate cookies and a fluffy marshmallow-buttercream filling capture classic bakery-style whoopie pies at home.
- Simple pantry ingredients and straightforward steps make this totally doable, even if you are not an experienced baker.
- Perfect for parties, bake sales, or lunchbox treats: they are portable, fun to eat, and look impressive.
- Easy to customize with different fillings, sprinkles, or flavor twists without changing the base recipe.
Grocery List
- Produce: None required.
- Dairy: Unsalted butter, buttermilk, milk or heavy cream (for the filling)
- Pantry: All-purpose flour, unsweetened cocoa powder, granulated sugar, powdered sugar, marshmallow creme/fluff, baking soda, baking powder, vanilla extract, fine salt, nonstick spray or parchment paper
Full Ingredients
Chocolate Whoopie Pie Cakes
- 2 cups (260 g) all-purpose flour, spooned and leveled
- 3/4 cup (75 g) unsweetened cocoa powder, sifted if lumpy
- 1 1/4 teaspoons baking soda
- 1 teaspoon baking powder
- 1/2 teaspoon fine sea salt (or table salt)
- 1/2 cup (115 g) unsalted butter, softened to room temperature
- 1 cup (200 g) granulated sugar
- 1 large egg, at room temperature
- 2 teaspoons pure vanilla extract
- 1 cup (240 ml) buttermilk, at room temperature
Marshmallow-Buttercream Filling
- 1 cup (225 g) unsalted butter, softened to room temperature
- 2 cups (240 g) powdered sugar, sifted
- 2 cups (about 7 oz / 200 g) marshmallow creme or marshmallow fluff
- 1 teaspoon pure vanilla extract
- 1/4 teaspoon fine sea salt
- 2–3 tablespoons whole milk or heavy cream, as needed for consistency
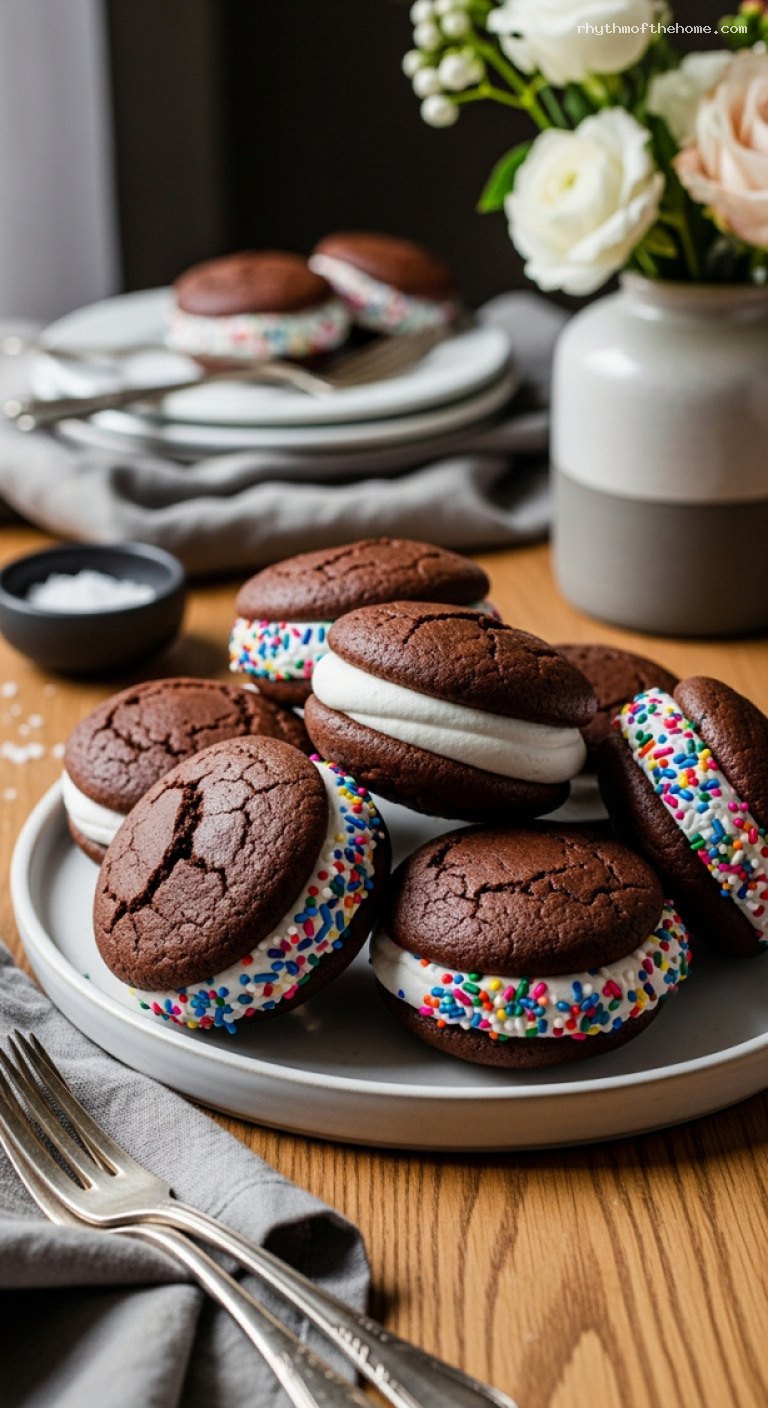
Optional Garnishes
- Chocolate sprinkles, rainbow sprinkles, or sanding sugar (roll the filling edges)
- Flaky sea salt (a tiny pinch on the filling for a sweet-salty contrast)
Step-by-Step Instructions
Step 1: Preheat the oven and prepare your pans
Set your oven to 350°F (175°C) with a rack in the center. Line 2 large baking sheets with parchment paper or silicone baking mats. This prevents sticking and helps the cakes bake evenly with neat, rounded bottoms. If you only have one baking sheet, bake the batter in batches, keeping the remaining batter at room temperature.
If you like extra tidy, uniform whoopie pies, lightly draw 2-inch circles on the underside of the parchment as a guide, spacing them about 2 inches apart. Flip the parchment over so the pencil or pen marks are underneath, then place it on the baking sheet.
Step 2: Mix the dry ingredients
In a medium mixing bowl, whisk together the flour, cocoa powder, baking soda, baking powder, and salt until thoroughly combined and no streaks remain. Breaking up any cocoa lumps here gives you a smooth, even chocolate batter later. Set this bowl aside.
Taking the time to whisk the dry ingredients well ensures the leaveners (baking soda and baking powder) are evenly distributed, which helps the whoopie pies rise consistently and keeps them soft and cake-like.
Step 3: Cream butter and sugar, then add egg and vanilla
In a large bowl (or the bowl of a stand mixer fitted with the paddle attachment), beat the softened 1/2 cup (115 g) butter and 1 cup (200 g) granulated sugar on medium-high speed for 2–3 minutes, until the mixture looks light and fluffy. Scrape down the sides and bottom of the bowl as needed.
Add the egg and beat again for 30–60 seconds, until fully incorporated and creamy. Mix in the 2 teaspoons vanilla extract. The mixture should look smooth and slightly thick; if it appears curdled, keep mixing until it comes together.
Step 4: Add buttermilk and combine with dry ingredients
With the mixer on low speed, slowly pour in the 1 cup (240 ml) buttermilk. The batter may look a little separated at this point; that is normal and will smooth out when you add the dry ingredients.
Add the dry ingredient mixture in two additions, mixing on low just until combined after each addition. Stop and scrape the bowl to ensure no flour pockets remain. The finished batter should be thick but scoopable, similar to a soft cake batter. Do not overmix, or the cakes can turn tough instead of tender.
Step 5: Scoop and bake the whoopie pie cakes
Using a 2-tablespoon scoop or a rounded tablespoon, drop mounds of batter onto the prepared baking sheets, spacing them about 2 inches apart to allow for spreading. Try to keep the mounds similar in size so it is easy to match pairs later.
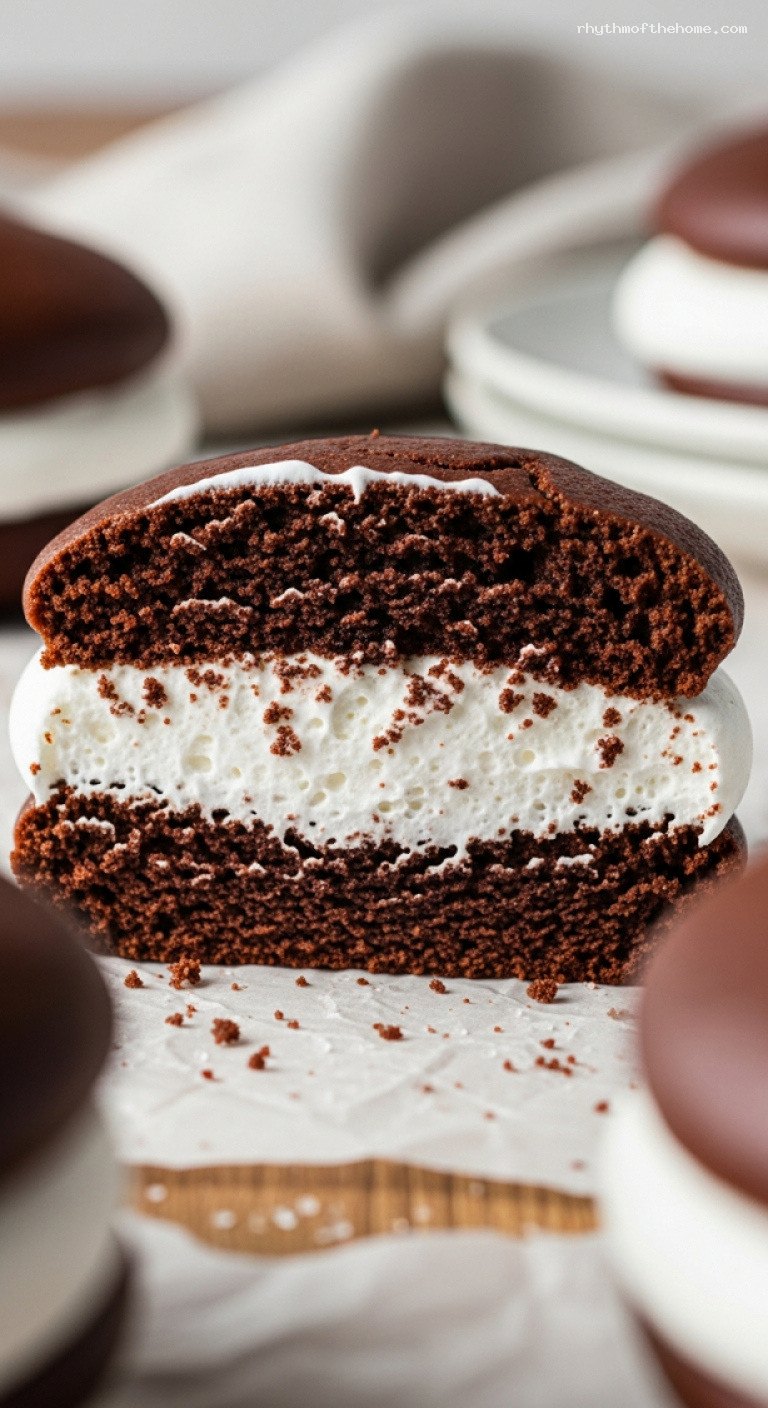
Bake one sheet at a time for 10–12 minutes, until the tops appear set, spring back lightly when gently pressed, and a toothpick inserted into the center of one cake comes out with a few moist crumbs but no wet batter. Do not overbake; you want them just done for a soft, cake-like texture.
Let the cakes cool on the baking sheet for 5 minutes, then carefully transfer them to a wire rack to cool completely. The cakes must be fully cooled before you add the filling or the buttercream will melt.
Step 6: Make the marshmallow-buttercream filling
Once the cakes are cool, prepare the filling. In a large bowl (or stand mixer with the paddle or whisk attachment), beat the 1 cup (225 g) softened butter on medium-high speed for 2–3 minutes until very smooth and creamy.
Gradually add the 2 cups (240 g) powdered sugar, mixing on low at first to avoid a sugar cloud, then increasing to medium speed until light and fluffy. Scrape down the bowl.
Add the 2 cups (about 200 g) marshmallow creme, 1 teaspoon vanilla extract, and 1/4 teaspoon salt. Beat on medium-high for 1–2 minutes, until the filling is thick, glossy, and pillowy. If it seems too stiff, add milk or cream 1 tablespoon at a time, beating after each addition, until you have a smooth, spreadable consistency that will hold its shape when piped or spooned.
Step 7: Assemble the whoopie pies
Arrange the cooled chocolate cakes in pairs of similar size, flipping half of them upside down so the flat sides face up. This ensures each whoopie pie sandwiches the filling between two flat sides for a neat look.
Transfer the marshmallow-buttercream filling to a piping bag fitted with a round tip (or use a resealable plastic bag with a corner snipped off). Pipe a generous swirl or dollop of filling (about 2 tablespoons) onto the flat side of each bottom cake. Alternatively, you can spoon and spread the filling with an offset spatula or butter knife.
Top each with a second cake, flat side down, and gently press and twist to spread the filling to the edges. If desired, roll the exposed filling edges in sprinkles or sanding sugar. Serve immediately, or chill briefly to help them firm up before serving.
Pro Tips
- Room temperature ingredients: Bring butter, egg, and buttermilk to room temperature before starting. This helps them blend smoothly and gives you a more tender, even crumb.
- Uniform size: Use a cookie scoop for evenly sized cakes. Matching up pairs is easier, and your whoopie pies will bake and stack more consistently.
- Do not overbake: Pull the cakes from the oven as soon as they spring back when lightly touched. Overbaked cakes will be dry and less “whoopie-like.”
- Chill for clean edges: If your kitchen is warm, chill filled whoopie pies for 20–30 minutes to set the filling before transporting or stacking.
- Make it neat: For very tidy edges, pipe the filling slightly inside the edge, then gently press the top cake to spread the filling exactly to the sides.
Variations
- Chocolate chip filling: Fold 1/2 cup (90 g) mini chocolate chips into the finished marshmallow-buttercream for extra texture and chocolate bursts.
- Mint chocolate whoopie pies: Replace the vanilla in the filling with 1/2 teaspoon peppermint extract and add a drop or two of green food coloring for a subtle minty twist.
- Peanut butter swirl: Beat 1/3 cup (85 g) creamy peanut butter into half the filling, then swirl it with the plain marshmallow-buttercream when piping for a peanut butter cup vibe.
Storage & Make-Ahead
Store assembled whoopie pies in an airtight container, layered between sheets of parchment paper. Keep them in the refrigerator for up to 4 days. For the best texture and flavor, let them sit at room temperature for 20–30 minutes before serving so the cakes soften and the filling becomes creamy again.
You can make the chocolate cakes up to 2 days ahead: once completely cool, wrap tightly and refrigerate, or freeze for up to 2 months. Thaw at room temperature before filling. The marshmallow-buttercream can be prepared up to 2 days in advance and chilled in an airtight container; bring it back to room temperature and re-whip briefly before using to restore its fluffy texture.
Nutrition (per serving)
Approximate values per whoopie pie (1 of 16): about 360 calories; 18 g fat (11 g saturated); 48 g carbohydrates; 2 g fiber; 34 g sugars; 4 g protein; 260 mg sodium. These numbers are estimates and will vary based on exact ingredient brands and portion sizes.

Leave a Reply