
Quick Recipe Version (TL;DR)
Quick Ingredients
- 3/4 cup (150 g) granulated sugar
- 1/4 cup (30 g) cornstarch + 1/4 tsp fine salt
- 4 large egg yolks (reserve whites if making meringue)
- 2 3/4 cups (660 ml) whole milk + 1/2 cup (120 ml) heavy cream
- 2 tbsp unsalted butter + 2 tsp vanilla extract
- 50–60 vanilla wafers (about 8 oz / 225 g)
- 4–5 ripe bananas, sliced
- For whipped cream topping: 1 1/4 cups (300 ml) heavy cream, 3 tbsp powdered sugar, 1 tsp vanilla
- For meringue topping: 4 egg whites, 1/2 cup (100 g) sugar, 1/4 tsp cream of tartar, 1/2 tsp vanilla
Do This
- 1. Whisk sugar, cornstarch, and salt in a saucepan. Whisk in milk, cream, and egg yolks.
- 2. Cook over medium heat, whisking constantly, until thick and bubbling, 6–10 minutes. Off heat, whisk in butter and vanilla.
- 3. Let pudding cool 10–15 minutes, stirring occasionally so it stays pourable.
- 4. In a 2–2.5 quart baking dish, layer wafers, banana slices, and warm pudding. Repeat to make 2–3 layers, ending with pudding.
- 5. For meringue: whip egg whites with cream of tartar and sugar to stiff peaks, spread on warm pudding, and bake at 350°F (175°C) for 12–15 minutes until golden.
- 6. For whipped cream: chill pudding layers at least 4 hours, whip cream with powdered sugar and vanilla, then spread over cold pudding.
- 7. Chill until set (at least 4 hours total) and serve cold with extra wafers and banana slices if desired.
Why You’ll Love This Recipe
- Classic, nostalgic flavor with layers of vanilla wafers, ripe bananas, and real homemade vanilla pudding.
- Flexible finish: choose a traditional baked meringue or an easy, fluffy whipped cream topping.
- Perfect make-ahead dessert for gatherings, potlucks, and holidays.
- Creamy, silky texture that contrasts with soft bananas and tender wafers for the ultimate comfort dessert.
Grocery List
- Produce: 4–5 ripe bananas (yellow with plenty of brown spots)
- Dairy: Whole milk, heavy whipping cream, unsalted butter
- Pantry: Granulated sugar, powdered sugar, cornstarch, vanilla extract, fine salt, vanilla wafers, cream of tartar (for meringue, optional)
Full Ingredients
For the Silky Vanilla Pudding
- 3/4 cup (150 g) granulated sugar
- 1/4 cup (30 g) cornstarch
- 1/4 tsp fine sea salt
- 4 large egg yolks (reserve the 4 egg whites for meringue if using)
- 2 3/4 cups (660 ml) whole milk, cold
- 1/2 cup (120 ml) heavy cream, cold
- 2 tbsp (28 g) unsalted butter, cut into pieces
- 2 tsp pure vanilla extract
For the Banana Pudding Layers
- 50–60 vanilla wafers (about 8 oz / 225 g)
- 4–5 medium ripe bananas, peeled and sliced 1/4 inch thick (about 3 1/2–4 cups sliced)
- Optional: 1–2 tsp lemon juice, lightly tossed with the banana slices to slow browning
For the Whipped Cream Topping (Option 1)
- 1 1/4 cups (300 ml) cold heavy whipping cream
- 3 tbsp (about 24 g) powdered sugar
- 1 tsp pure vanilla extract
For the Meringue Topping (Option 2)
- 4 large egg whites (from the yolks used in the pudding)
- 1/2 cup (100 g) granulated sugar
- 1/4 tsp cream of tartar
- 1/2 tsp pure vanilla extract
Step-by-Step Instructions
Step 1: Prepare Your Dish and Ingredients
Lightly grease a 2–2.5 quart (about 2–2.5 liter) deep baking dish or casserole with a tiny bit of butter or nonstick spray. This will help the slices come out a bit cleaner.
Separate 4 large eggs, placing the yolks into a medium heatproof bowl and reserving the whites in a clean bowl if you plan to make the meringue topping. Peel and slice the bananas into 1/4-inch rounds. If desired, gently toss them with 1–2 teaspoons of lemon juice to slow browning, but do not drench them or the flavor will be noticeable.
If you plan to use the meringue topping, preheat your oven to 350°F (175°C). If you are using whipped cream, preheating is not necessary.
Step 2: Mix the Pudding Base
In a medium saucepan (preferably with a heavy bottom), whisk together the sugar, cornstarch, and salt until no lumps of cornstarch remain. This helps the cornstarch distribute evenly and prevents clumping later.
In the bowl with the egg yolks, whisk in about 1/2 cup of the cold milk until smooth and well combined. Pour the remaining milk and the heavy cream into the saucepan with the sugar mixture, whisking to combine. Then slowly whisk in the egg yolk mixture until the liquid is smooth and uniform.
Step 3: Cook and Thicken the Pudding
Place the saucepan over medium heat. Cook, whisking constantly, making sure to reach the edges and corners of the pan so nothing sticks and scorches. The mixture will feel thin for several minutes, then gradually start to thicken.
Once the pudding begins to bubble, continue to cook and whisk for 1–2 minutes. It should be thick enough to coat the back of a spoon and hold a line if you run your finger through it. Remove the pan from the heat and immediately whisk in the butter and vanilla extract until fully melted and incorporated.
Step 4: Cool the Pudding Slightly
Transfer the hot pudding to a large bowl (this helps it cool a bit faster), or keep it in the saucepan if it is comfortable to handle. Let it sit for 10–15 minutes, stirring every few minutes. It should still be warm and pourable but not steaming-hot when you layer it with the bananas.
If a skin forms on top, simply whisk it back into the pudding. If your kitchen is very warm, you can press a piece of plastic wrap directly onto the surface while it rests to prevent a skin from forming, removing it just before layering.
Step 5: Layer the Wafers, Bananas, and Pudding
Spread a thin layer of warm pudding (2–3 tablespoons) over the bottom of your prepared baking dish. This helps anchor the first layer of cookies.
Add a single layer of vanilla wafers over the bottom, fitting them snugly together. Top with a layer of banana slices, overlapping them slightly as needed.
Spoon about one-third of the warm pudding over the bananas and gently spread it into an even layer, nudging it down between the wafers and banana slices so there are no big air pockets.
Repeat the layering: wafers, bananas, and pudding, until you have 2–3 full layers, ending with a generous layer of pudding on top. You can reserve a few wafers and banana slices for garnish if you like.
Step 6: Choose and Add Your Topping
For the Meringue Topping: Make sure your pudding layers are still warm. Using a stand mixer or hand mixer, beat the egg whites and cream of tartar on medium speed until foamy. Gradually add the sugar, 1 tablespoon at a time, then increase the speed to high and beat until glossy stiff peaks form. Beat in the vanilla.
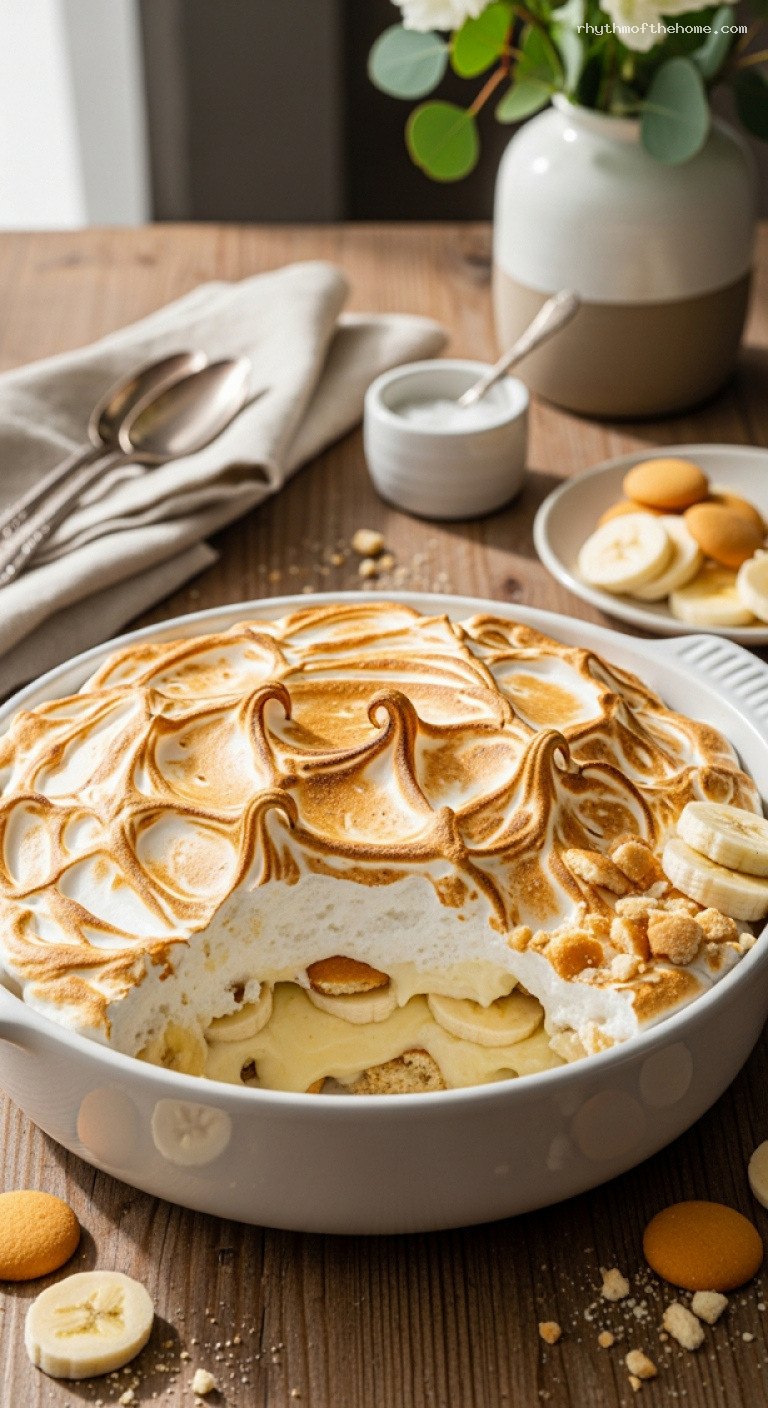
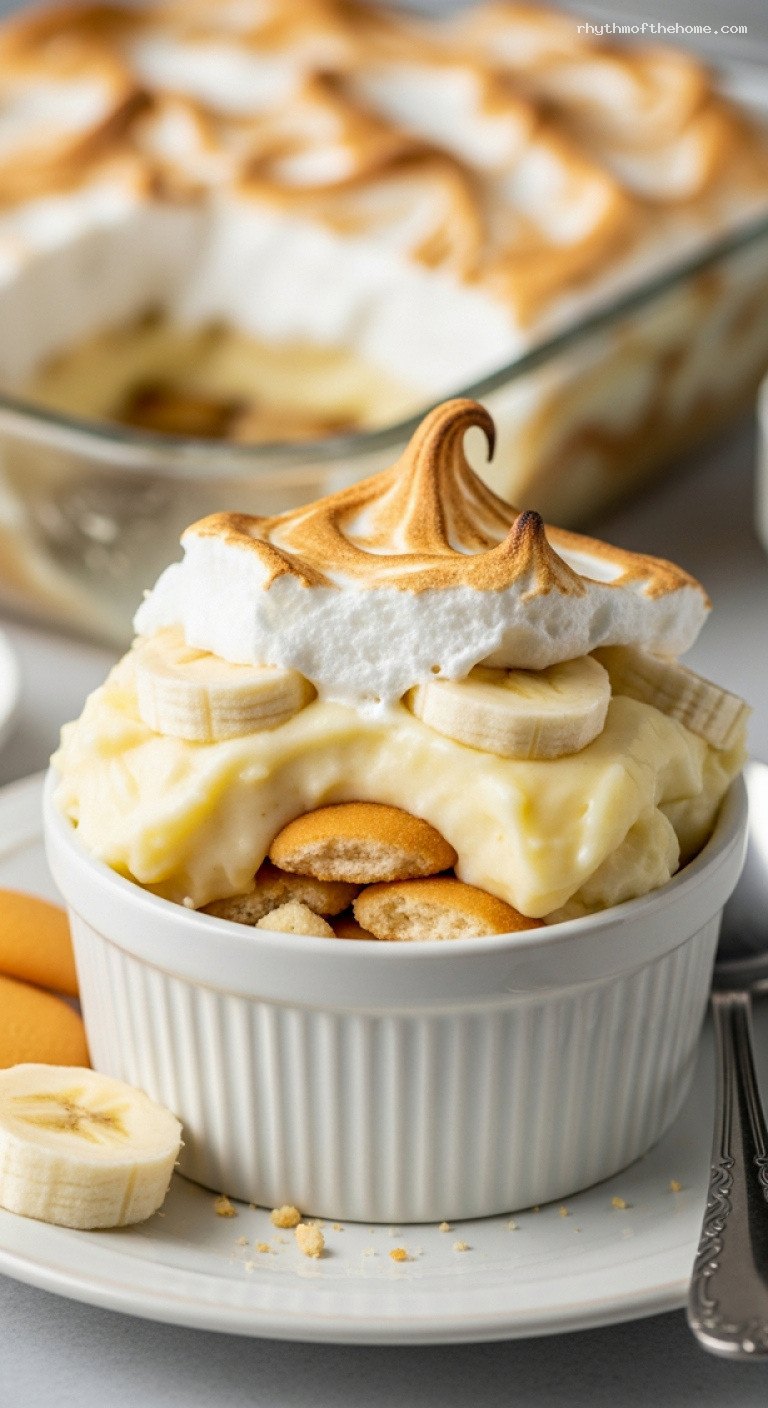
Spread or pipe the meringue over the warm pudding, making sure to seal it all the way to the edges of the dish (this helps prevent weeping). Use the back of a spoon to create swirls and peaks. Bake at 350°F (175°C) for 12–15 minutes, or until the meringue is lightly golden brown on top. Cool on a rack for about 1 hour, then chill for at least 2 hours before serving.
For the Whipped Cream Topping: Cover the pudding layers (without topping) and chill for at least 4 hours, or until completely cold and set. Just before serving, whip the cold heavy cream with powdered sugar and vanilla on medium-high speed until medium-stiff peaks form. Spread or pipe the whipped cream over the chilled pudding in soft swirls. Garnish with extra wafers and banana slices if desired.
Step 7: Chill, Serve, and Enjoy
Banana pudding is best when it has had time to chill and for the wafers to soften slightly. Aim for at least 4 hours of total chilling time, and up to overnight in the refrigerator.
To serve, scoop into bowls with a large spoon, making sure each portion includes plenty of pudding, bananas, and wafers. If you like, crumble a few extra vanilla wafers on top for a touch of crunch and sprinkle with very thin banana slices just before bringing it to the table.
Pro Tips
- Use spotty bananas: Bananas that are fully yellow with plenty of brown speckles are sweeter and more flavorful, which makes the dessert taste like a true classic.
- Whisk constantly: Continuous whisking while cooking the pudding prevents lumps and keeps the bottom from scorching, giving you a perfectly silky texture.
- Seal meringue to the edges: When using meringue, make sure it touches the edge of the dish all the way around to minimize weeping and shrinking.
- Layer while pudding is warm: Pouring warm pudding over the wafers helps them soften into that nostalgic cake-like texture.
- Chill thoroughly: Allow enough chill time for the flavors to meld and the pudding to fully set; overnight is ideal if you can plan ahead.
Variations
- No-bake shortcut: Use your favorite instant vanilla pudding mix prepared with cold milk, and layer it with wafers and bananas. Finish with whipped cream instead of meringue for a completely no-bake version.
- Toasted coconut twist: Add 1/2 cup of toasted shredded coconut between the layers and sprinkle a little on top of the whipped cream for added texture and flavor.
- Individual jars: Layer the pudding, wafers, and bananas in small glass jars or parfait cups for single-serve desserts that are easy to transport and look impressive.
Storage & Make-Ahead
Cover the banana pudding tightly with plastic wrap or a lid and store in the refrigerator for up to 3 days. The bananas will gradually darken and the wafers will soften more over time, but the flavor remains delicious.
For the meringue version, it is best enjoyed the day it is made, though leftovers can be refrigerated for up to 2 days. Some weeping from the meringue is normal. For the whipped cream version, you can assemble the layers up to 24 hours in advance and add the whipped cream topping up to 4 hours before serving.
This dessert does not freeze well, as the bananas become mushy and the texture of the pudding and wafers deteriorates when thawed.
Nutrition (per serving)
Approximate values for 1 of 8 servings, with whipped cream topping: about 430 calories; 18 g fat; 11 g saturated fat; 60 g carbohydrates; 2 g fiber; 39 g sugars; 8–10 g protein; 220 mg sodium. Values will vary based on brand of wafers, exact portion size, and whether you use meringue or whipped cream.

Leave a Reply