
Quick Recipe Version (TL;DR)
Quick Ingredients
- 1 1/2 cups (150 g) finely ground toasted hazelnuts
- 1 1/2 cups (180 g) powdered sugar, divided
- 2 tbsp (16 g) cornstarch
- 6 large egg whites (about 180 g), room temperature
- 3/4 cup (150 g) granulated sugar
- 1/2 tsp cream of tartar or 1 tsp lemon juice
- 1 tsp vanilla extract
- Pinch of fine sea salt
- 2 cups (480 ml) heavy cream, well chilled
- 1/3 cup (40 g) powdered sugar (for cream)
- 6 oz (170 g) dark or semisweet chocolate, chopped (optional ganache)
- 3/4 cup (180 ml) heavy cream (for ganache)
- 1 tbsp (14 g) unsalted butter (for ganache)
- Extra toasted hazelnuts and shaved chocolate for garnish
Do This
- 1. Heat oven to 250°F (120°C). Trace three 8-inch circles on parchment-lined baking sheets. Toast hazelnuts, cool, and grind finely.
- 2. Pulse ground hazelnuts with 1 1/2 cups powdered sugar and cornstarch until fine and well combined.
- 3. Whip egg whites with salt and cream of tartar to soft peaks, then slowly add granulated sugar and vanilla; beat to stiff, glossy peaks.
- 4. Gently fold hazelnut mixture into meringue. Divide among the three circles, spreading evenly. Bake 75–90 minutes until dry and crisp; cool completely in oven with door slightly ajar.
- 5. Whip 2 cups cold cream with 1/3 cup powdered sugar and vanilla to medium-firm peaks. For ganache, pour hot cream over chopped chocolate and butter; stir smooth.
- 6. Layer dacquoise discs with whipped cream (and thin layers or drizzles of ganache, if using). Finish with cream, ganache drizzle, and toasted hazelnuts on top.
- 7. Chill at least 1 hour before slicing with a serrated knife. Serve cold or slightly chilled.
Why You’ll Love This Recipe
- Light yet indulgent: crisp hazelnut meringue with airy whipped cream feels elegant, not heavy.
- Texture heaven: shatteringly crisp layers, tender centers, and silky cream (plus rich ganache if you like).
- Make-ahead friendly: bake the meringue layers in advance and assemble later.
- Showstopper dessert: looks like a fancy patisserie cake, but is very achievable for home bakers.
Grocery List
- Produce: Optional: fresh berries or mint for garnish.
- Dairy: Heavy cream, unsalted butter.
- Pantry: Whole hazelnuts (or hazelnut meal), granulated sugar, powdered sugar, cornstarch, eggs, vanilla extract, dark or semisweet chocolate, fine sea salt, cream of tartar or lemon juice.
Full Ingredients
Hazelnut Dacquoise Layers
- 1 1/2 cups (150 g) finely ground toasted hazelnuts (from about 1 3/4 cups / 200 g whole hazelnuts)
- 1 1/2 cups (180 g) powdered (confectioners’) sugar
- 2 tbsp (16 g) cornstarch
- 6 large egg whites (about 180 g), at room temperature
- 3/4 cup (150 g) granulated sugar
- 1/2 tsp cream of tartar or 1 tsp fresh lemon juice
- 1 tsp pure vanilla extract
- Pinch of fine sea salt
Light Vanilla Whipped Cream Filling
- 2 cups (480 ml) heavy whipping cream, very cold
- 1/3 cup (40 g) powdered sugar
- 1 tsp pure vanilla extract
- Optional: 1 tbsp Frangelico (hazelnut liqueur) or strong cooled espresso for flavor
Optional Chocolate Ganache (for filling or drizzle)
- 6 oz (170 g) dark or semisweet chocolate, finely chopped
- 3/4 cup (180 ml) heavy cream
- 1 tbsp (14 g) unsalted butter
- Pinch of fine sea salt (enhances chocolate flavor)
For Garnish
- 1/4 cup (30 g) roughly chopped toasted hazelnuts
- Dark chocolate curls or shavings
- Optional: fresh berries or a few mint leaves
Step-by-Step Instructions
Step 1: Prepare pans and toast the hazelnuts
Preheat your oven to 350°F (175°C). Line a baking sheet with parchment and spread the hazelnuts in a single layer. Toast for 8–10 minutes, shaking the pan once or twice, until the nuts smell fragrant and the skins look blistered. Transfer to a clean kitchen towel and rub to remove as much of the skins as possible (do not worry if some bits remain). Let cool completely.
Reduce the oven temperature to 250°F (120°C). Prepare two large baking sheets with parchment paper. On the underside of the parchment, trace three 8-inch (20 cm) circles (you can use a cake pan or plate as a guide), spacing them well apart. Flip the parchment so the pencil side is down; you should still see the circles through the paper.
Step 2: Make the hazelnut-sugar mixture
Place the cooled hazelnuts in a food processor and pulse until finely ground, being careful not to over-process into a paste. Add the powdered sugar and cornstarch. Pulse in short bursts until the mixture is very fine and evenly combined, with no large nut pieces remaining. Set aside. If you do not have a food processor, use pre-ground hazelnut meal and whisk it together thoroughly with the powdered sugar and cornstarch, then sift to remove any coarse bits.
Step 3: Whip the meringue
In a clean, dry mixing bowl (stand mixer or large handheld bowl), add the egg whites and a pinch of salt. Beat on medium speed until foamy. Add the cream of tartar (or lemon juice), then continue beating until the whites look opaque and form soft peaks.
With the mixer running on medium-high, gradually sprinkle in the granulated sugar, 1–2 tablespoons at a time, allowing it to dissolve before adding more. Add the vanilla. Continue beating until the meringue is thick, glossy, and holds stiff peaks that stand straight up when you lift the whisk. Rub a tiny bit between your fingers; it should feel almost smooth, not gritty. If it feels sandy, keep whisking for another minute or two.
Step 4: Fold in hazelnuts, shape discs, and bake
Sprinkle about one-third of the hazelnut-sugar mixture over the meringue and gently fold with a spatula, turning the bowl and cutting down through the center. Repeat with the remaining hazelnut mixture in two more additions, folding just until no dry pockets remain. Take care not to deflate the meringue.
Divide the batter roughly into thirds. You can spoon it directly onto the traced circles or transfer it to a large piping bag fitted with a plain tip. Spread or pipe the meringue within each circle to form three even discs about 1/2 inch (1.25 cm) thick, smoothing the tops with an offset spatula. Keep the edges neat for easier stacking.
Place the trays in the 250°F (120°C) oven. Bake for 75–90 minutes, rotating the pans halfway through, until the discs feel dry to the touch and lift easily from the parchment. They should be crisp and very pale beige, not browned. Turn off the oven, prop the door open slightly with a wooden spoon, and let the dacquoise layers cool completely inside for at least 45–60 minutes. This helps them dry out fully and stay crisp.
Step 5: Make the whipped cream and optional ganache
Once the dacquoise layers are nearly cool, prepare the fillings. For the whipped cream, combine the cold heavy cream, powdered sugar, and vanilla (plus Frangelico or espresso if using) in a chilled mixing bowl. Whip on medium-high speed until medium-firm peaks form. The cream should be thick enough to hold its shape between layers but still soft and spreadable. Be careful not to over-whip; if it starts to look grainy, stop immediately.
For the ganache (if using), place the chopped chocolate and butter in a heatproof bowl. Heat the cream in a small saucepan over medium heat until it just begins to steam and small bubbles appear around the edges, but do not let it boil. Pour the hot cream over the chocolate, sprinkle in a tiny pinch of salt, and let sit for 1–2 minutes. Then whisk gently from the center outward until smooth and glossy. Allow to cool until thickened but still pourable or spreadable, 10–20 minutes, depending on room temperature.
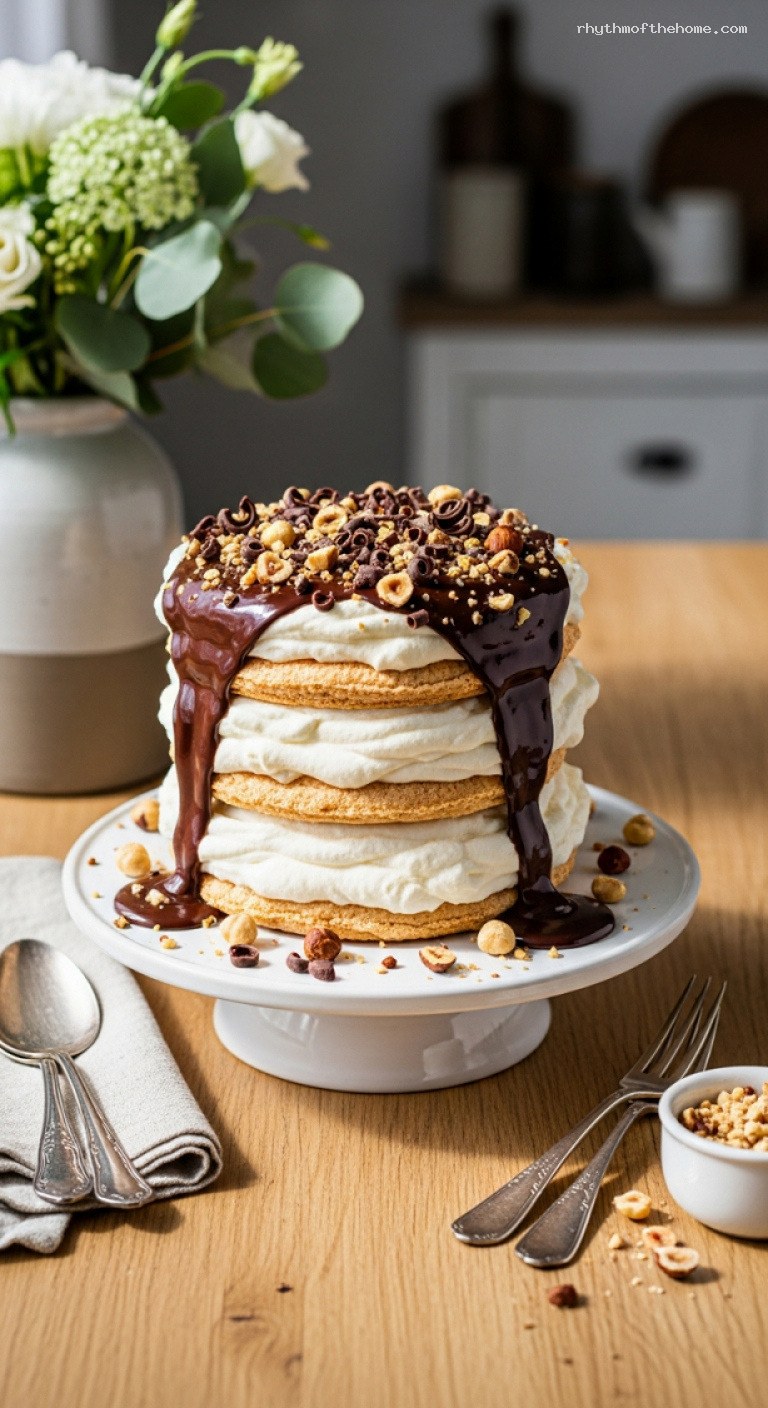
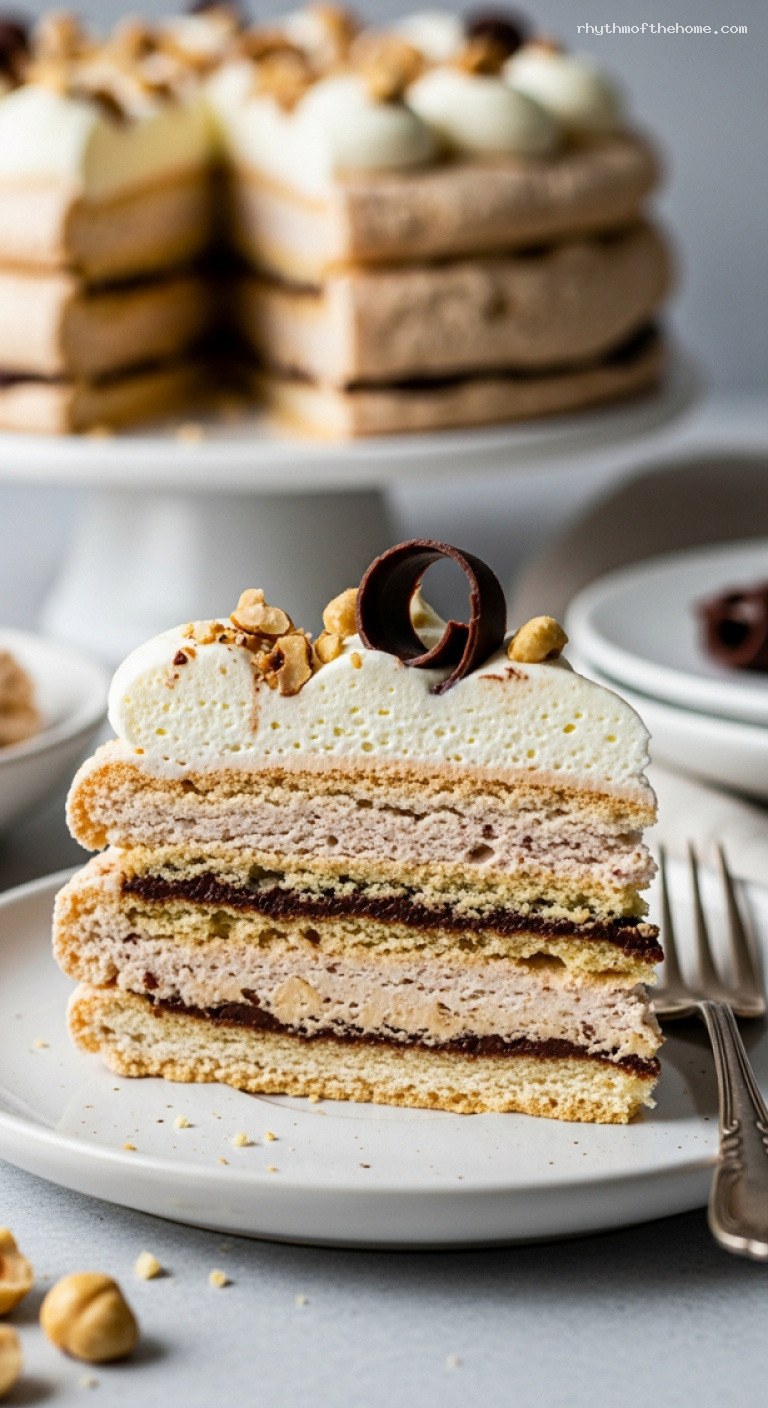
Step 6: Assemble the hazelnut dacquoise cake
Carefully peel the cooled dacquoise discs off the parchment. Choose the flattest, prettiest one for the top layer. Place one disc on your serving plate, meringue-side up. Spread about one-third of the whipped cream evenly over the surface, leaving a small border around the edge so it does not ooze out too much when stacked. If using ganache, either drizzle a few spoonfuls over the cream or spread a very thin layer directly on the dacquoise, then add a slightly smaller amount of cream on top.
Repeat with the second dacquoise disc and another layer of cream (and ganache, if desired). Place the final disc on top. Spread the remaining cream over the top disc, swirling it decoratively. If you like, spoon or drizzle some ganache over the top in ribbons, allowing a few drips to run down the sides for a rustic look.
Step 7: Garnish, chill, and serve
Sprinkle the top with chopped toasted hazelnuts and chocolate shavings. Add a few fresh berries or mint leaves if you want a pop of color. Refrigerate the assembled cake for at least 1 hour (and up to about 6 hours) before serving. This short rest allows the cream to set slightly and the dacquoise to soften just a bit while still staying crisp at the edges.
To serve, use a sharp serrated knife. Gently saw through the layers rather than pressing straight down to avoid cracking. Wipe the blade between cuts for the cleanest slices. Serve the dacquoise well chilled or just slightly cool.
Pro Tips
- Keep everything grease-free: Any fat (egg yolk, oil, butter) in the bowl will prevent the egg whites from whipping properly. Make sure your mixing bowl and whisk are spotless and dry.
- Grind hazelnuts with sugar, not alone: Processing the nuts together with powdered sugar and cornstarch helps absorb oils and keeps the mixture powdery instead of turning into nut butter.
- Bake low and slow: The low temperature dries the meringue instead of browning it. If your oven runs hot, crack the door slightly or lower the temperature by 25°F (about 10–15°C).
- Adjust texture to your taste: For very crisp layers, bake toward the longer time and cool fully in the oven. For slightly chewier centers, bake closer to the shorter time and cool on a rack once they are firm enough to lift.
- Stabilize whipped cream if needed: For extra-stable cream (especially in warm kitchens), gently fold in 2–3 tablespoons of mascarpone cheese or use a packet of whipped cream stabilizer.
Variations
- Mocha-Hazelnut Dacquoise: Add 2 tsp instant espresso powder to the meringue when you add the vanilla, and whip 1 tbsp cooled espresso into the cream. Finish with a dark chocolate ganache drizzle.
- All-Chocolate Ganache Layers: Skip the whipped cream and sandwich the dacquoise discs with slightly cooled, thickened ganache for a richer, truffle-like dessert. Add a very thin layer of raspberry jam under the ganache for contrast.
- Mini Individual Dacquoise Stacks: Instead of three large discs, pipe 3-inch (7–8 cm) rounds and bake slightly less time. Stack into individual towers with cream and a drizzle of ganache on each plate.
Storage & Make-Ahead
Unfilled dacquoise layers: Once completely cool and dry, store the discs in an airtight container at room temperature for up to 3 days, with parchment between layers. In humid climates, you can wrap well and freeze for up to 1 month; bring to room temperature in the sealed container to avoid condensation.
Whipped cream and ganache: Whipped cream is best made the day you plan to assemble. Ganache can be made 2–3 days ahead; cover and refrigerate, then gently rewarm over a double boiler or in short microwave bursts until spreadable.
Assembled cake: Keep covered and refrigerated. It is best within 24 hours, but will hold reasonably well for up to 2 days. The longer it sits, the softer and more cake-like the dacquoise becomes. This dessert does not freeze well once assembled due to the whipped cream.
Nutrition (per serving)
Approximate values for 1 of 10 servings (with whipped cream and ganache): about 550 calories; 42 g fat; 37 g carbohydrates; 7 g protein; 3 g fiber; 33 g sugars; 140 mg sodium. These numbers are estimates and will vary based on exact ingredients and portion sizes.

Leave a Reply