
Quick Recipe Version (TL;DR)
Quick Ingredients
- 6 tbsp unsalted butter, softened (for greasing ramekins)
- 2 tbsp granulated sugar + 2 tbsp unsweetened cocoa (for coating ramekins)
- 170 g (6 oz) bittersweet chocolate (60–70% cocoa), chopped
- 115 g (8 tbsp / 1 stick) unsalted butter, cubed
- 3 large eggs (room temperature)
- 3 large egg yolks (room temperature)
- 100 g (1/2 cup) granulated sugar
- 1 tsp pure vanilla extract
- 30 g (1/4 cup) all-purpose flour
- 1/4 tsp fine sea salt
- Powdered sugar, berries, vanilla ice cream (optional, for serving)
Do This
- 1. Preheat oven to 425°F (220°C). Generously butter six 6-oz ramekins, then coat with a mixture of sugar and cocoa. Place on a baking sheet.
- 2. Melt chopped chocolate and 115 g butter together in a heatproof bowl over barely simmering water (or in short microwave bursts). Stir until smooth; cool slightly.
- 3. In a separate bowl, whisk eggs, yolks, 100 g sugar, salt, and vanilla until thickened and pale, 2–3 minutes.
- 4. Slowly whisk warm chocolate mixture into egg mixture. Sift flour over the top and fold gently just until combined.
- 5. Divide batter evenly among ramekins (about 3/4 full). Bake 11–13 minutes until edges are set but centers are soft and slightly jiggly.
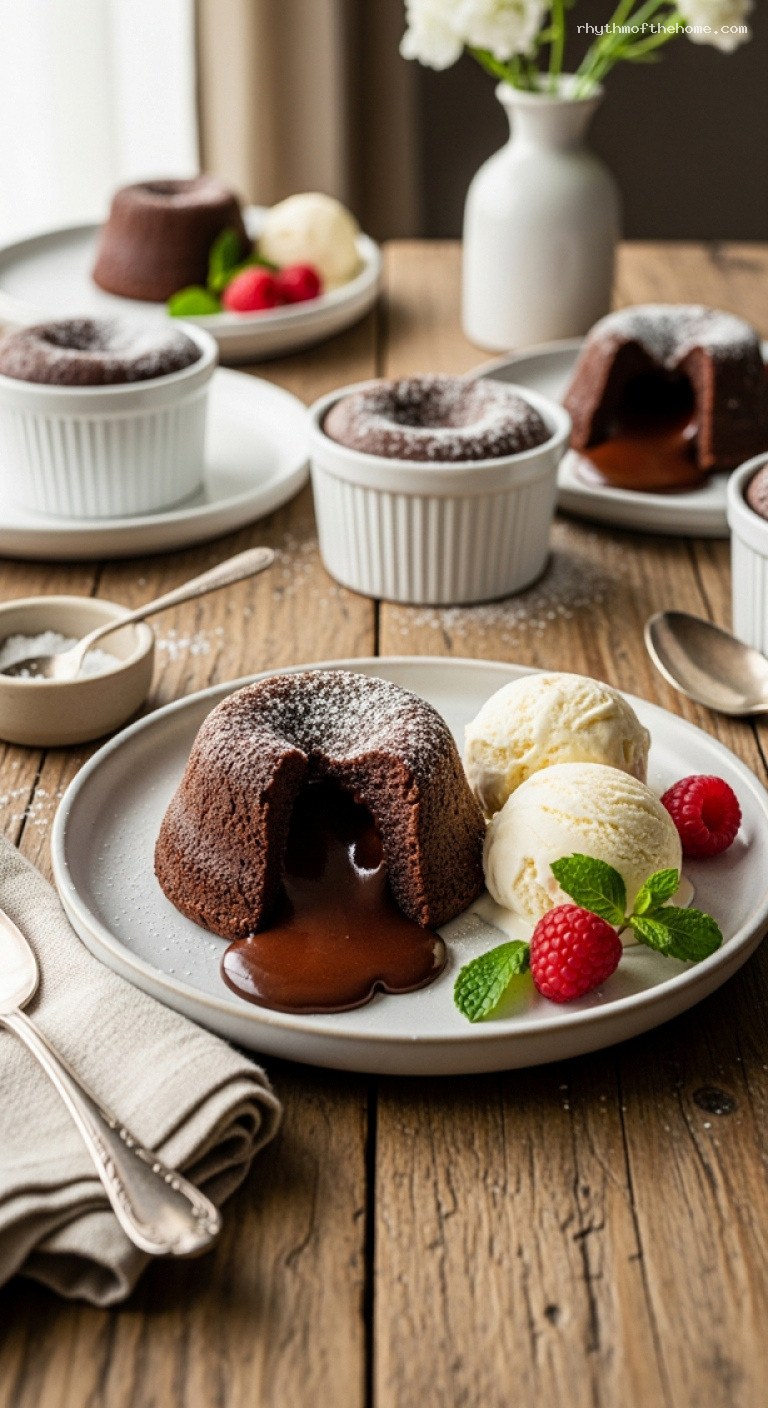
- 6. Rest 1–2 minutes. Run a knife around edges, invert onto plates, and lift off ramekins. Dust with powdered sugar and serve immediately with berries and ice cream.
Why You’ll Love This Recipe
- Classic restaurant-style chocolate lava cakes made entirely at home with simple pantry ingredients.
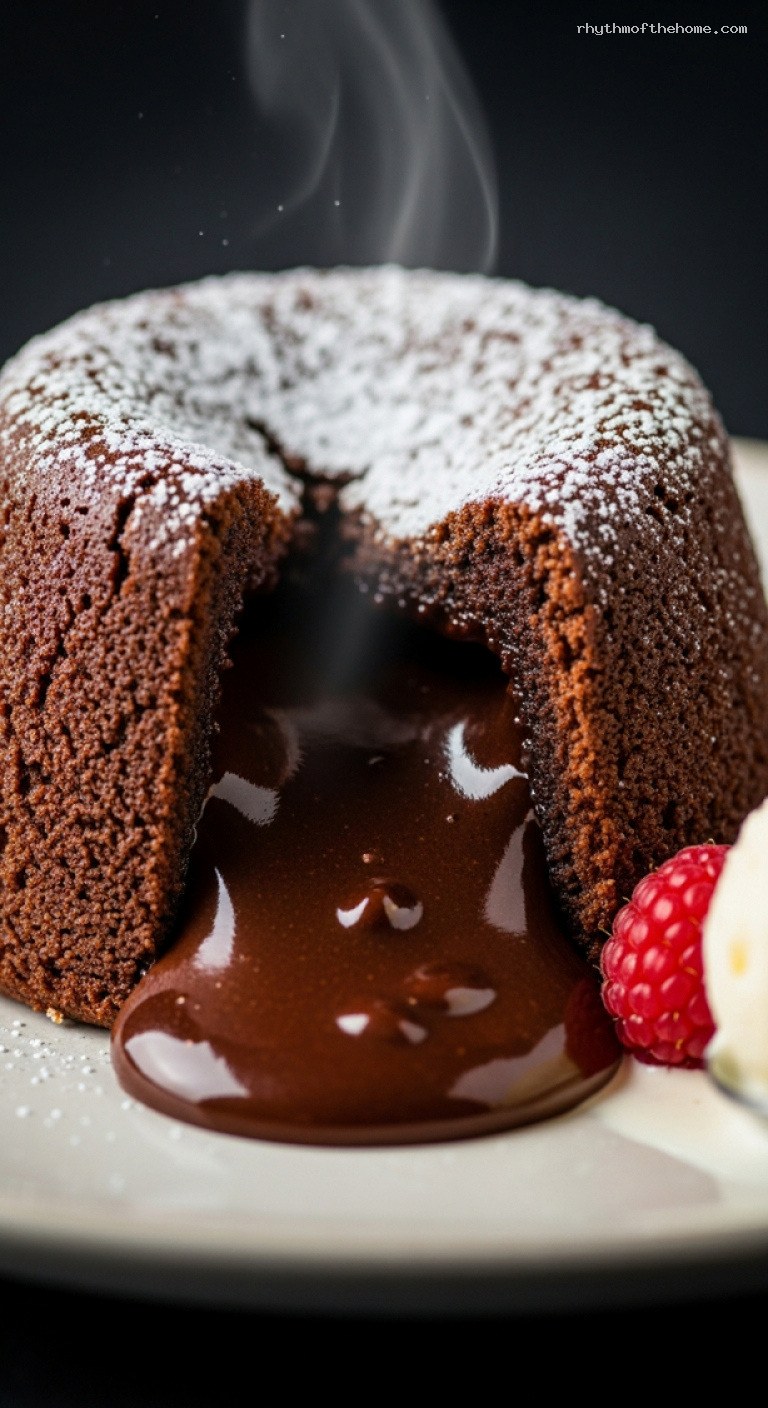
- A lightly set, tender cake exterior that gives way to a rich, molten chocolate center.
- Ready in about 30 minutes, so it is perfect for last-minute dinner parties or date night.
- Easy to customize with different chocolates, fillings, and toppings.
Grocery List
- Produce: Fresh berries (raspberries, strawberries, or sliced strawberries) for serving (optional)
- Dairy: Unsalted butter, heavy cream or ready-made whipped cream (optional), vanilla ice cream (optional)
- Pantry: Bittersweet chocolate (60–70% cocoa), granulated sugar, powdered sugar, all-purpose flour, unsweetened cocoa powder, vanilla extract, fine sea salt
Full Ingredients
For Preparing the Ramekins
- 6 tbsp unsalted butter, softened (for greasing 6 ramekins)
- 2 tbsp granulated sugar
- 2 tbsp unsweetened cocoa powder
- 6 oven-safe ramekins, about 6 oz (175 ml) capacity each
For the Chocolate Lava Cake Batter
- 170 g (6 oz) bittersweet chocolate (60–70% cocoa), finely chopped
- 115 g (8 tbsp / 1 stick) unsalted butter, cut into cubes
- 3 large eggs, at room temperature
- 3 large egg yolks, at room temperature
- 100 g (1/2 cup) granulated sugar
- 1 tsp pure vanilla extract
- 30 g (1/4 cup) all-purpose flour, spooned and leveled
- 1/4 tsp fine sea salt
For Serving (Optional but Recommended)
- Powdered sugar, for dusting
- Fresh berries (such as raspberries or sliced strawberries)
- Vanilla ice cream or lightly sweetened whipped cream
- Chocolate shavings or curls
- Fresh mint leaves, for garnish
Step-by-Step Instructions
Step 1: Prepare the oven and ramekins
Preheat your oven to 425°F (220°C) with a rack in the center. Line a rimmed baking sheet with parchment paper for easy cleanup and to help stabilize the ramekins.
Generously butter the inside of each 6-oz ramekin with the softened butter, making sure to coat all the way up the sides and into the corners. In a small bowl, stir together the granulated sugar and cocoa powder. Add a spoonful of this mixture to a ramekin, rotate and tap until the bottom and sides are thoroughly coated, then tap out any excess. Repeat with the remaining ramekins.
Arrange the prepared ramekins on the baking sheet. This makes them easy to move as a group and helps them bake evenly.
Step 2: Gently melt the chocolate and butter
Place the chopped bittersweet chocolate and 115 g (1 stick) cubed butter into a heatproof bowl. Set the bowl over a saucepan of barely simmering water, making sure the bottom of the bowl does not touch the water. Stir frequently until the mixture is completely melted and smooth.
Alternatively, melt in the microwave in 20–30 second bursts, stirring thoroughly between each burst, until just melted and glossy. Do not overheat; chocolate can burn and become grainy. Once melted, remove from heat and set aside to cool slightly while you prepare the egg mixture. It should be warm but not so hot that it scrambles the eggs.
Step 3: Whisk the eggs, yolks, and sugar
In a medium mixing bowl, combine the 3 eggs, 3 egg yolks, and 100 g (1/2 cup) granulated sugar. Add the salt and vanilla extract. Using a hand mixer, stand mixer, or a sturdy whisk, beat the mixture on medium-high speed for 2–3 minutes until it is thickened, slightly foamy, and noticeably paler in color.
This step helps incorporate air, which gives the cakes a light, tender exterior while still allowing the center to stay molten. When you lift the whisk, the mixture should fall back in a ribbon that briefly sits on the surface before sinking back in.
Step 4: Combine the chocolate mixture and fold in the flour
Give the melted chocolate and butter mixture a stir. It should be warm but not hot to the touch. With the mixer on low speed, slowly pour the chocolate mixture into the egg mixture in a thin, steady stream, mixing just until evenly blended. Scrape down the sides and bottom of the bowl to ensure everything is combined.
Place a fine-mesh sieve over the bowl and sift in the all-purpose flour. Using a spatula, gently fold the flour into the batter, turning the bowl as you go, until no dry streaks remain. Avoid overmixing at this stage; you want to keep the batter light and airy.
Step 5: Fill the ramekins and bake
Divide the batter evenly among the prepared ramekins, filling each about 3/4 full. Smooth the tops slightly with the back of a spoon if needed.
Transfer the baking sheet with the ramekins to the preheated oven. Bake for 11–13 minutes, depending on your oven and the thickness of your ramekins. The cakes are done when the edges are set, puffed, and look dry, but the centers are still soft, slightly sunken, and jiggle when you gently shake the pan. The tops may develop light cracks; that is fine.
Step 6: Unmold and serve immediately
Remove the baking sheet from the oven and let the lava cakes rest for 1–2 minutes. This allows the edges to firm up just enough to unmold while the centers stay molten.
Working one at a time, run a thin knife or offset spatula around the inside edge of each ramekin to loosen the cake. Place a dessert plate upside down over a ramekin, then carefully flip both together. Let it sit for 5–10 seconds, then gently lift off the ramekin. The cake should release cleanly, revealing a soft, slightly domed cake.
Dust with powdered sugar and add berries, a scoop of vanilla ice cream or a dollop of whipped cream, and any desired garnishes. Serve at once while the center is still hot and molten. When you cut into the cake, the rich chocolate center should spill out onto the plate.
Pro Tips
- Use good chocolate. The flavor of the lava cakes depends heavily on the chocolate you choose. A bittersweet bar with 60–70% cocoa (not chocolate chips) gives the best rich, smooth melt and deep flavor.
- Room temperature eggs. Cold eggs do not whip as well and can cause the melted chocolate to seize. If you forget to take them out, place eggs in warm (not hot) water for 5–10 minutes.
- Watch the bake time closely. Ovens vary. Start checking at 11 minutes. It is better to slightly underbake than to overbake, or the center will set instead of staying molten.
- Generously butter and coat the ramekins. A thick, even layer of butter and cocoa-sugar mix is the best insurance against sticking and also creates a delicious, slightly crisp outer crust.
- Bake from chilled, if needed. If your batter or prepared ramekins are cold from the fridge, add 1–2 minutes to the baking time, watching the centers carefully.
Variations
- Salted caramel center: Fill ramekins halfway, add a chilled teaspoon of thick salted caramel in the center of each, then cover with remaining batter. Bake as directed for a lava cake with a caramel core.
- Espresso chocolate lava cakes: Dissolve 1–2 tsp instant espresso powder in 1 tbsp hot water and whisk into the melted chocolate mixture. This deepens the chocolate flavor and adds a subtle coffee note.
- Orange or raspberry twist: Add 1 tbsp orange liqueur or raspberry liqueur to the batter, and garnish with matching zest or fruit for a bright, fruity contrast to the dark chocolate.
Storage & Make-Ahead
These chocolate lava cakes are best enjoyed fresh from the oven, when the centers are at their most molten. However, you can make them ahead in a couple of ways. To prep ahead, assemble the batter, grease and coat the ramekins, and divide the batter among them. Cover each ramekin tightly with plastic wrap and refrigerate for up to 24–36 hours. When ready to bake, remove the ramekins from the fridge while the oven preheats, then bake as directed, adding about 1–2 extra minutes if the batter is still chilled.
Leftover baked lava cakes will lose their molten centers as they cool. You can store cooled cakes (in their ramekins or covered on a plate) in the refrigerator for up to 2 days. Reheat gently in the microwave in 15–20 second bursts or in a 300°F (150°C) oven for 8–10 minutes. The centers may not be as fluid, but the cakes will still be soft and very chocolatey.
Nutrition (per serving)
Approximate values per lava cake (without toppings): about 460 calories, 33 g fat (20 g saturated), 40 g carbohydrates, 4 g protein, 30 g sugar, 180 mg sodium. Adding ice cream, whipped cream, or caramel will increase the calorie and sugar content. These numbers are estimates and will vary based on the exact ingredients and portion sizes you use.

Leave a Reply